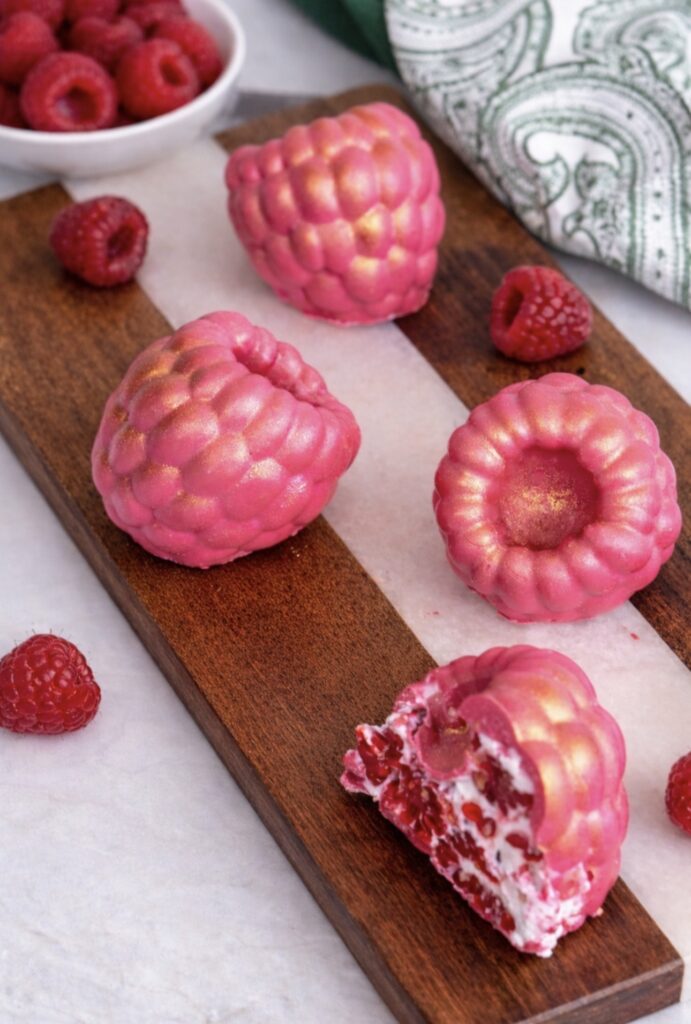

Chocolate Raspberry Yogurt Gems: Elegant, Creamy Bites That Look Like Real Raspberries
If you love desserts that are as beautiful as they are delicious, these Chocolate Raspberry Yogurt Gems are about to become your new obsession. Designed to look like real raspberries, each piece hides a creamy yogurt centre wrapped in a delicate chocolate shell. They are light, refreshing, and surprisingly simple to make, yet they deliver that “wow” factor every time you serve them. Perfect for entertaining, gifting, or simply treating yourself, these little gems bring together fresh fruit, creamy texture, and a crisp chocolate finish in one bite. If you enjoy visually stunning desserts like my Frozen Strawberry Yogurt Gems or Chocolate Blueberry Protein Bars, you’ll absolutely love this recipe.
Scroll down or tap ‘Jump to Recipe’ to get started.
Simple Ingredients, Big Flavour
What makes these chocolate raspberry yogurt gems so special is how a handful of simple ingredients transform into something truly elegant. Each element plays a key role in both texture and flavour:
- White chocolate – Creates a smooth, glossy shell that gives structure and that satisfying snap. It is also ideal if you want to create the signature pink raspberry look, as it takes colour beautifully. If you prefer to skip the colouring, you can use milk or dark chocolate instead for a more natural finish.
- Neutral oil – Added to the melted chocolate to create a smooth, pourable glaze. This simplifies the process and removes the need for tempering, making the recipe much more approachable while still giving a beautiful finish.
- Oil-based colouring – A few drops of hot pink colour are used to achieve that vibrant raspberry appearance. This step is optional, but it enhances the visual effect and makes the gems look strikingly realistic.
- Fresh raspberries – The star of the recipe, bringing natural sweetness and a slightly tangy contrast. If you love desserts with raspberries, make sure to check my Raspberry Cottage Cheese Bars and Passion Fruit Curd Raspberry Tarts.
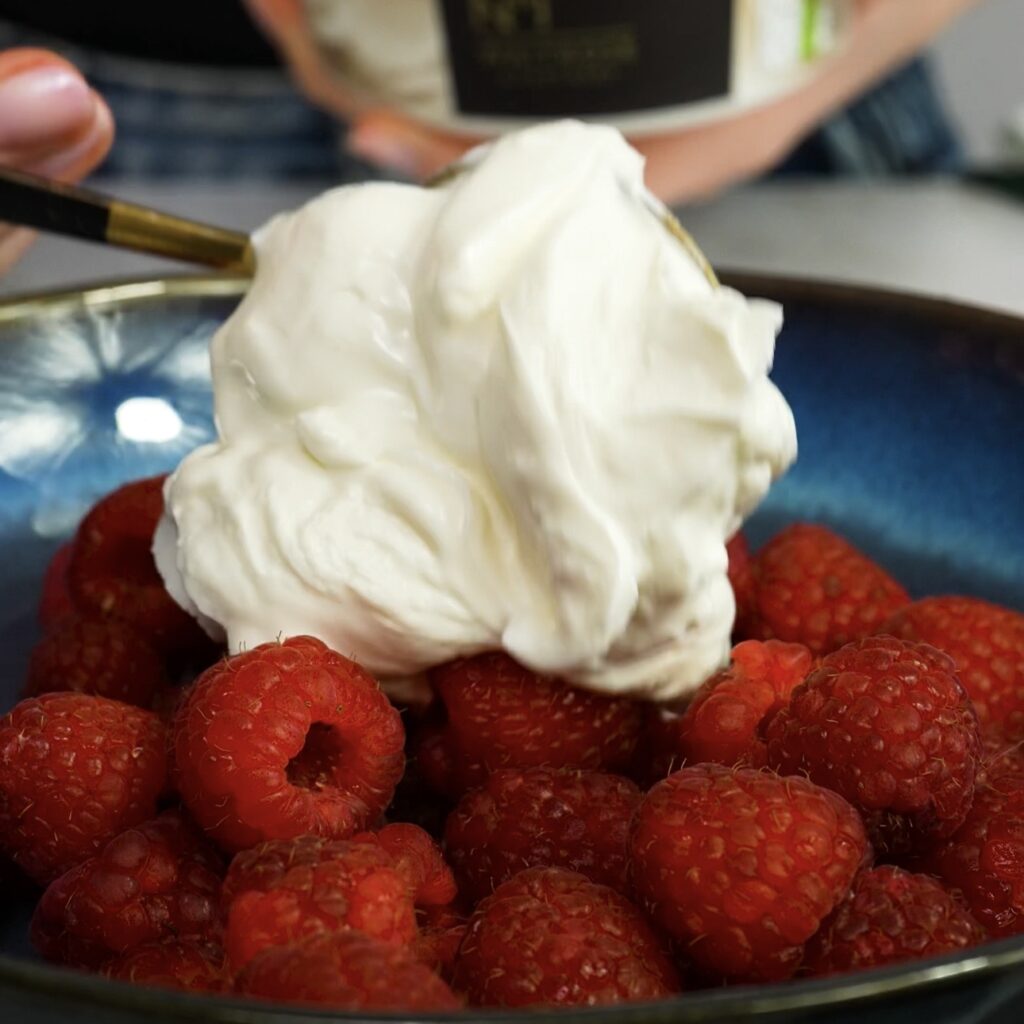
- Thick yogurt – Adds creaminess and balances the sweetness of the chocolate. Make sure to use thick yogurt. If your yogurt is too runny, strain it beforehand to achieve the right consistency.
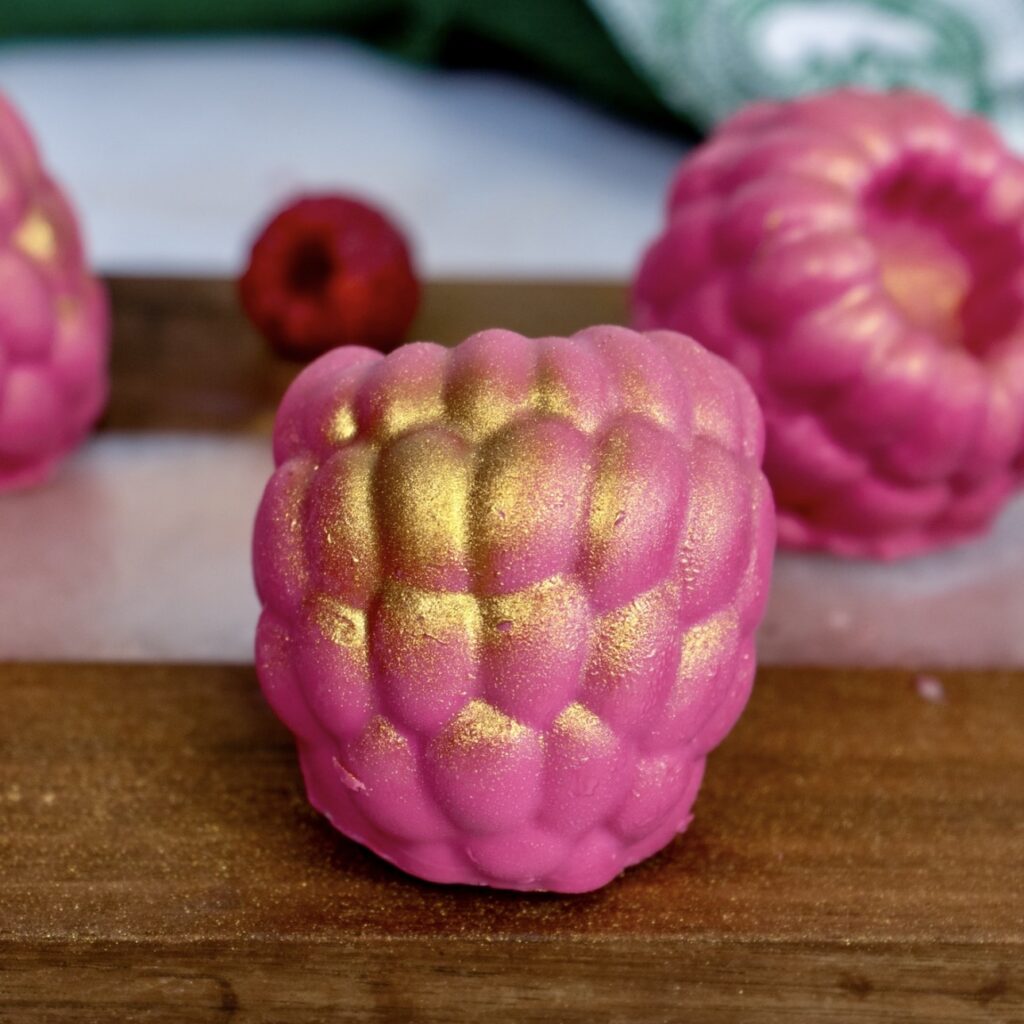
- Edible gold dust – Optional, but perfect if you want that premium, finished look
How to Make Chocolate Raspberry Yogurt Gems
Preparing the Chocolate Glaze
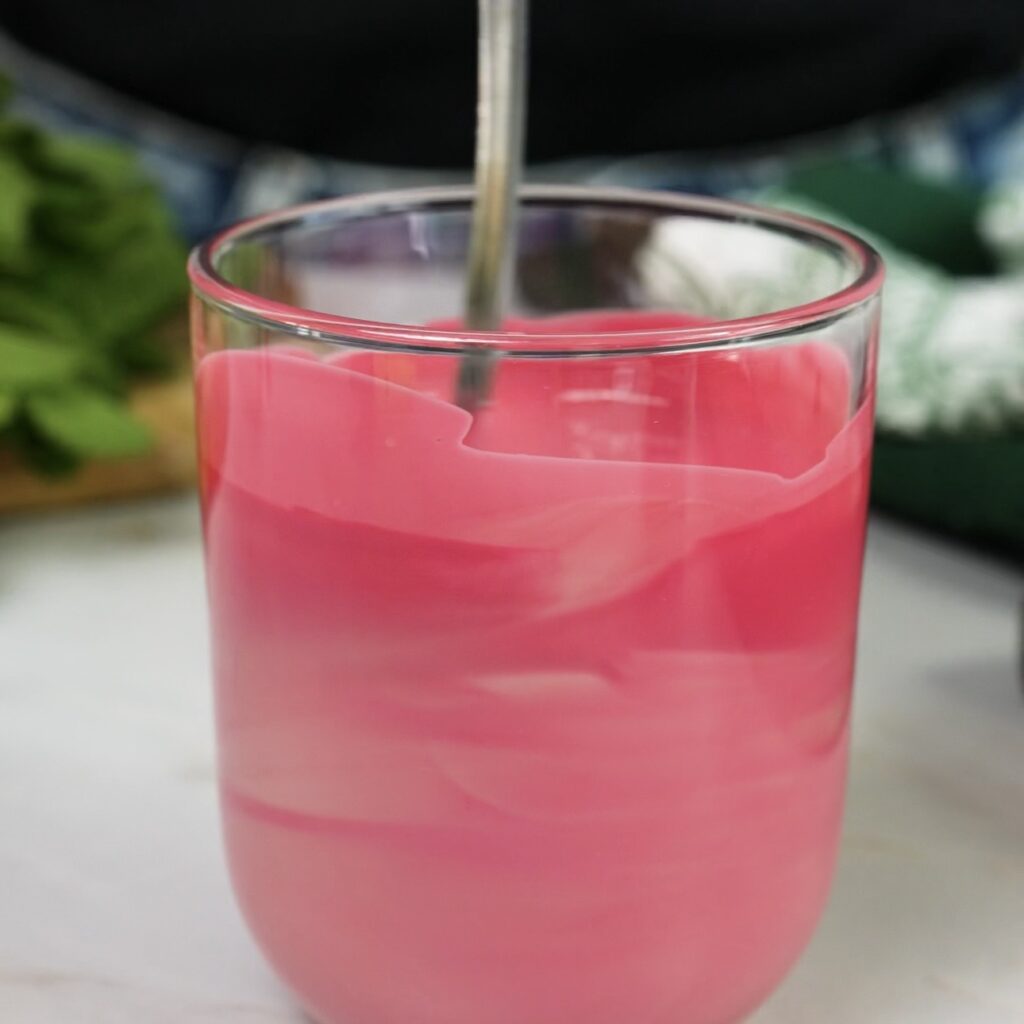
Begin by preparing the chocolate glaze. Melt the white chocolate using either a microwave or a double boiler. If using a microwave, heat in short 10-second bursts, stirring well between each until fully melted. If using a double boiler, place the chocolate in a heatproof bowl over gently simmering water, making sure the bowl does not touch the water, and stir until melted. Once fully melted, stir in the neutral oil until the mixture becomes smooth and glossy. This step creates a pourable glaze and removes the need for tempering. Transfer the chocolate to a glass for easier handling when coating the mould. Add a few drops of hot pink oil-based colour and stir until evenly combined. Allow the chocolate to cool for 10 to 15 minutes, until slightly thickened but still fluid enough to work with.
Building the Chocolate Shells
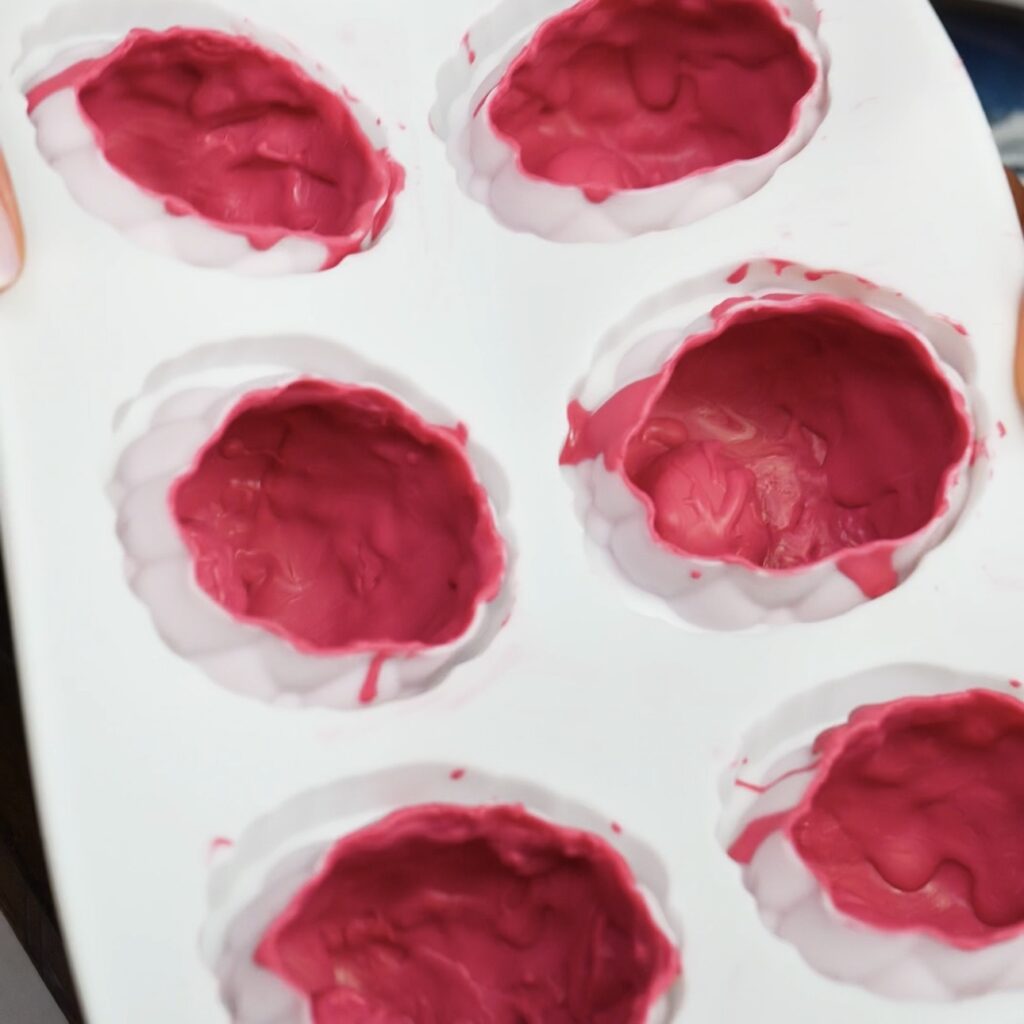
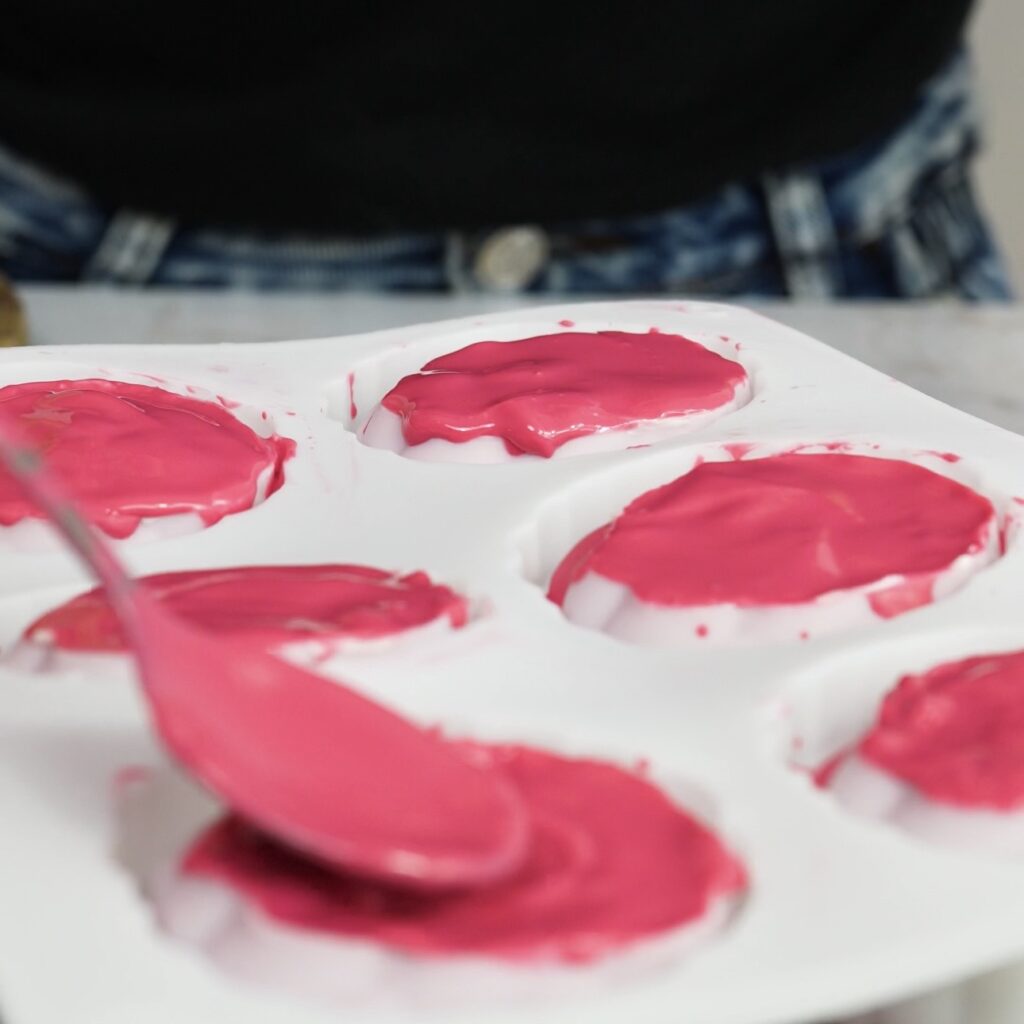
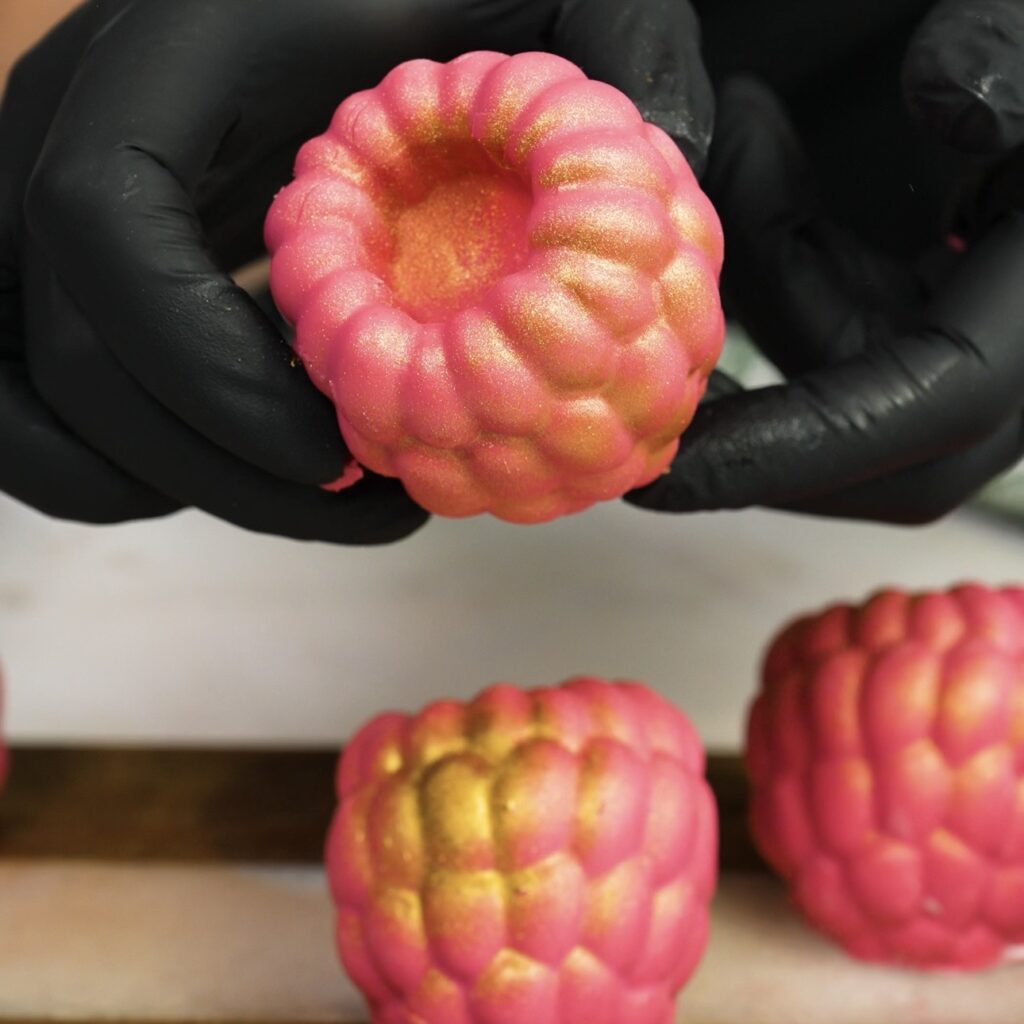
Using a spoon, coat a silicone mould with six raspberry-shaped cavities with the chocolate glaze. Spread the chocolate evenly across all surfaces, making sure to reach the corners and edges. Apply 2 to 3 layers if needed, chilling the mould in the fridge for about 10 minutes between each layer.
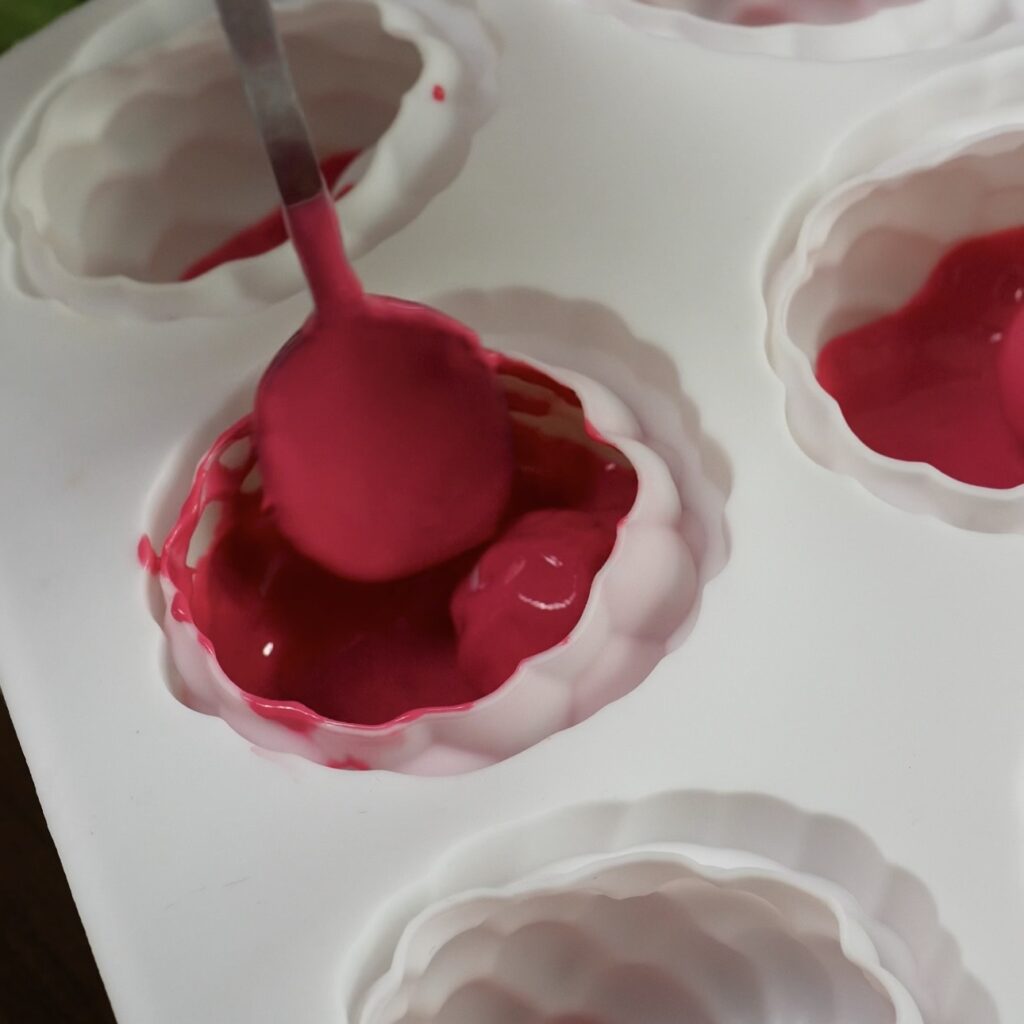
It is important to build a sturdy shell, as this will prevent the chocolate from breaking when removing the raspberries from the mould. Pay extra attention to the upper edges of each cavity, as these areas are the most delicate and need to be well coated.
Preparing the Filling and Assembling
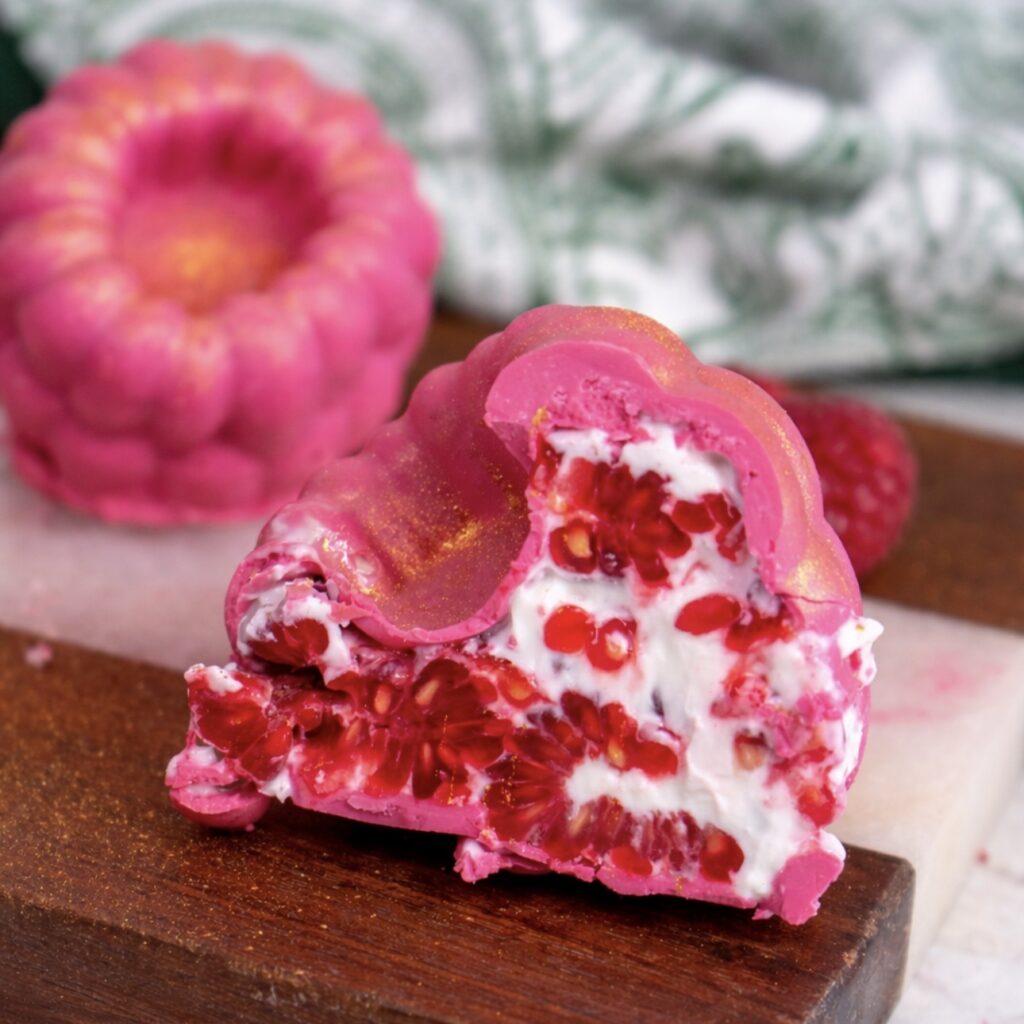
In a bowl, combine the raspberries with the thick yogurt and mix very gently, just enough to coat the berries without breaking them down. Try to keep the raspberries mostly whole for the best texture and appearance.
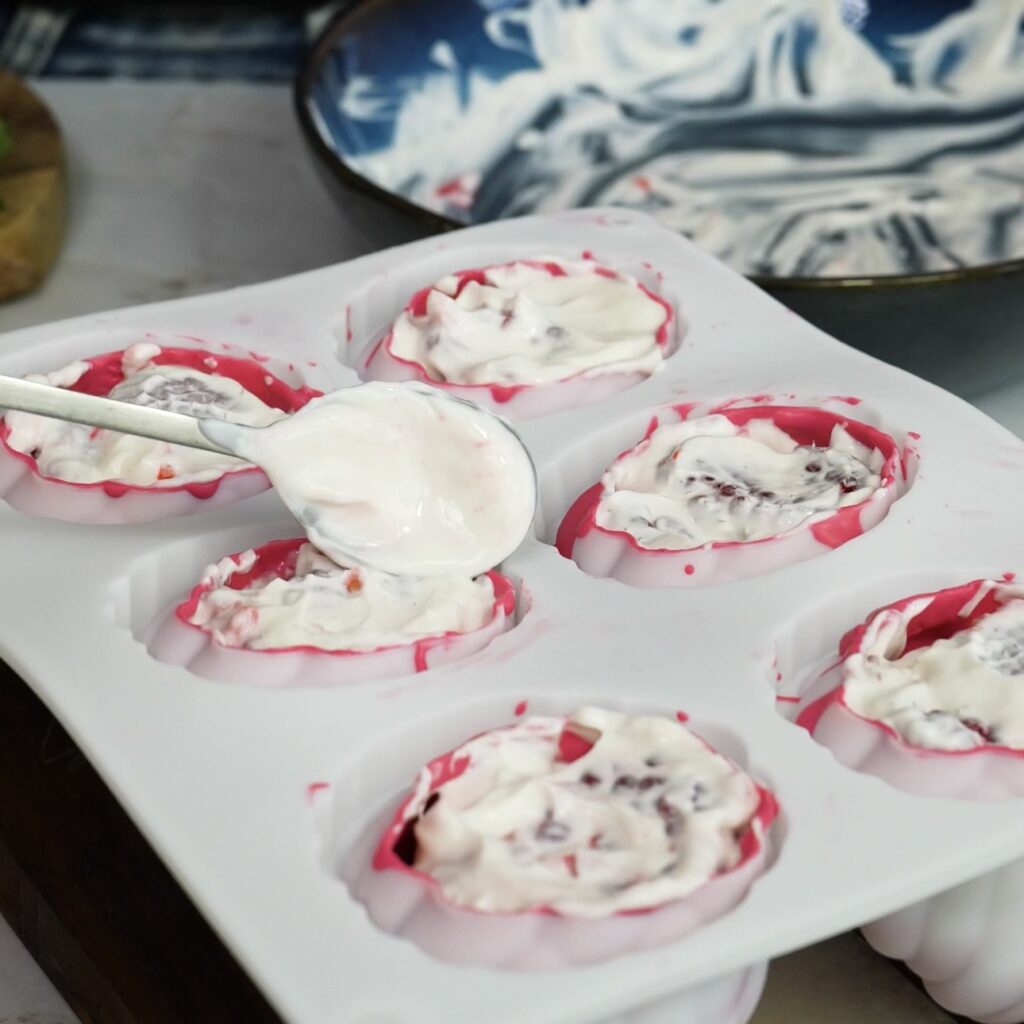
Fill each chocolate-coated cavity with the raspberry yogurt filling, smooth the tops, and seal with the remaining chocolate. Make sure the edges are fully sealed, as this will help with easy release from the mould later. Avoid overfilling, leaving just enough space to close each piece properly.
Transfer the mould to the freezer for 3 to 4 hours, or until the filling is fully frozen. This step is essential for clean removal. If you are not serving them immediately, keep them in the freezer and cover with cling film once the chocolate has set to protect them.
Unmoulding and Serving
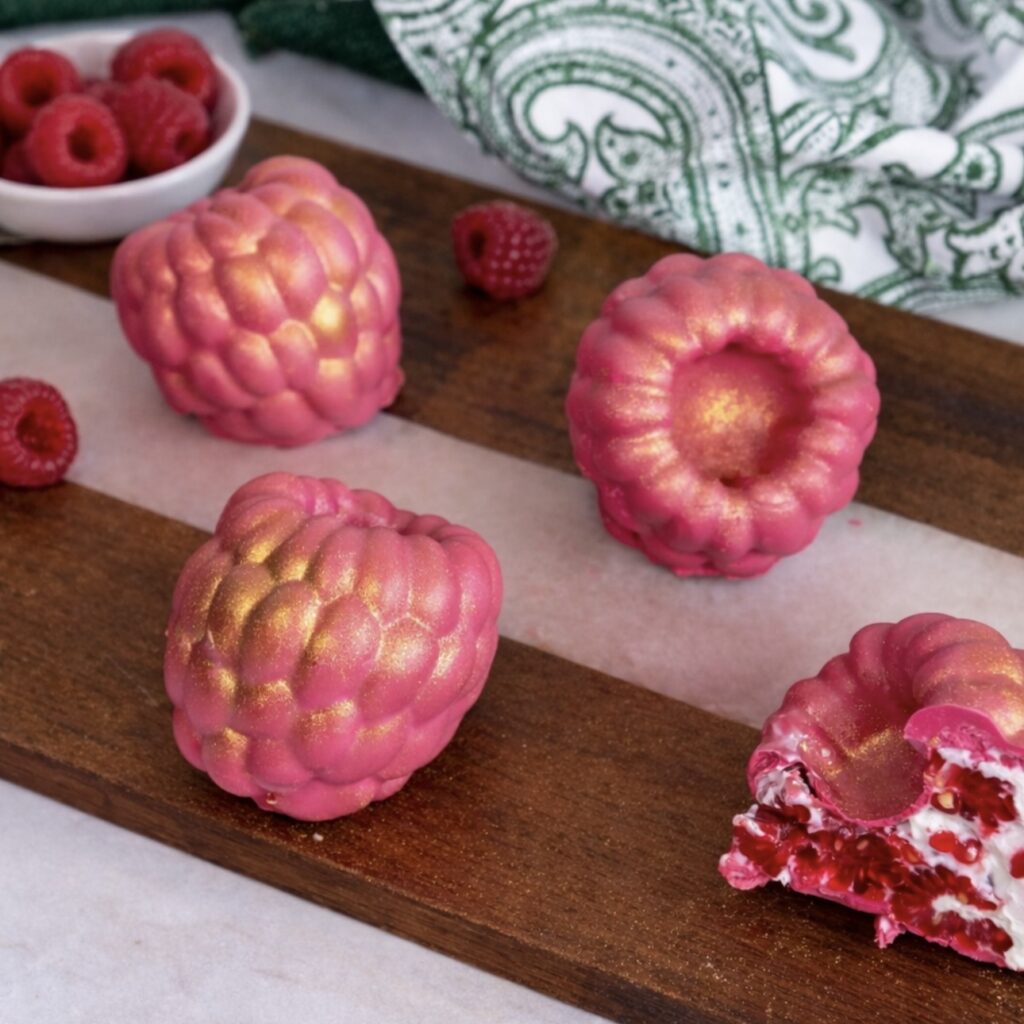
When ready to serve, carefully remove the raspberries from the mould by gently pressing from the bottom of the silicone cavities. If needed, let the mould sit at room temperature for a minute to make removal easier.
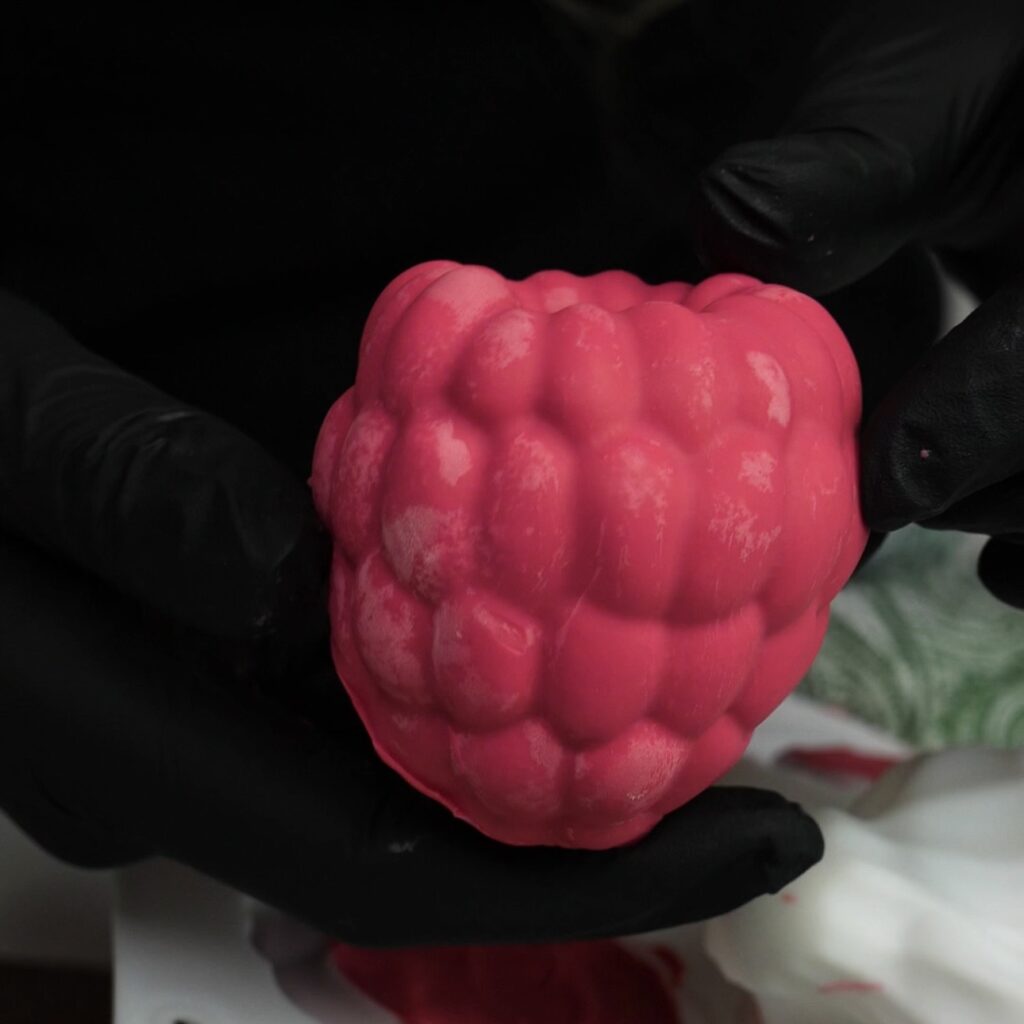
Place the raspberries on a serving plate and dust with edible gold if desired. Transfer them to the fridge for 30 minutes to 1 hour to defrost slightly before serving. This allows the centre to become smooth and creamy while keeping the chocolate shell intact.

They keep well in the fridge for up to 3 days or in the freezer for up to 1 month. Always allow them to defrost before serving for the best texture.
Why You’ll Love These Chocolate Raspberry Yogurt Gems
These little desserts are the perfect balance between indulgent and refreshing. The chocolate shell provides structure and sweetness, while the yogurt and raspberries keep the filling light and slightly tangy. They are also incredibly versatile. You can change the chocolate, switch the mould shape, or even experiment with different berries. Despite their elegant appearance, they are very approachable and require no baking at all. If you enjoy recipes that look impressive but are easy to make, this one belongs right alongside favourites like my Frozen Grape Yogurt Chocolate Bars or Cherry Cottage Cheese Ice Cream (High Protein).
Perfect for Any Occasion
Chocolate raspberry yogurt gems are ideal for everything from dinner parties to casual snacking. They are make-ahead friendly, store well, and are easy to portion, making them perfect for entertaining. Serve them as part of a dessert platter, alongside fresh fruit, or with a cup of coffee for a light, satisfying treat. They also make a beautiful edible gift. Like many of my easy dessert recipes, including Easy Banana Ice Cream Bar (No Churn) and Picota Cherry Pistachio Chocolate Bar, they are designed to fit effortlessly into your routine while still feeling special.
Instagram Tutorial & More
Want to see how these come together step by step? Watch our quick video tutorial on Instagram and don’t miss out on our other easy and creative dessert recipes:
- Mosaic Jelly Domes
- Blueberry Cottage Cheese Bites (High Protein, No Refined Sugar)
- Cottage Cheese Date Bites
- Blueberry Ricotta Tart
- Dubai Chocolate on a Budget
- Passion Fruit Ricotta Dessert (Syrok)
- Pistachio Stuffed Raspberries
- Frozen Blueberry Ricotta Pops
Happy cooking,
Izabella
Description
Delicate and eye-catching, these chocolate raspberry yogurt gems are shaped to look like real raspberries with a glossy chocolate shell. Inside, you’ll find a creamy yogurt filling with whole raspberries, gently folded to keep their natural texture. They are easy to prepare, require no baking, and come together with just a few simple ingredients. Perfect for entertaining or as an elegant sweet treat, they look impressive but are surprisingly simple to make. Best enjoyed slightly defrosted, when the centre turns smooth and creamy. A beautiful make-ahead dessert that stores well in the fridge or freezer.
Ingredients
Instructions
-
Begin by preparing the glaze. Melt the white chocolate using either a microwave or a double boiler. If using a microwave, heat in short 10-second bursts, stirring well between each until fully melted. If using a double boiler, place the chocolate in a heatproof bowl over gently simmering water, making sure the bowl does not touch the water, and stir until melted. Stir in the oil until smooth and glossy, then transfer to a glass for easier handling. Add a few drops of hot pink oil-based colour and mix until evenly combined. Allow the chocolate to cool for 10 to 15 minutes, until slightly thickened but still workable.
-
Using a spoon, coat a silicone mould with six raspberry-shaped cavities with the chocolate glaze. Spread it evenly across all surfaces, applying 2 to 3 layers if needed and chilling for about 10 minutes in the fridge between each layer. It is important to build a sturdy coating to prevent breakage when removing from the mould. Pay close attention to the sides and especially the upper edges of each cavity, making sure they are well covered.
-
In a bowl, combine the raspberries with the thick yogurt and mix very gently, just enough to coat the berries without breaking them down. Try to keep the raspberries mostly whole. Fill each cavity with the raspberry yogurt filling, smooth the tops, and seal with the remaining chocolate. Make sure the edges are properly sealed, as this will help with easy release from the mould. Transfer the mould to the freezer for 3 to 4 hours, until the filling is fully frozen. This step is essential for clean removal. If not serving straight away, keep them in the freezer and cover with cling film once the chocolate has set.
-
When ready to serve, carefully remove the raspberries from the mould and place them on a serving plate. Dust with edible gold if desired. Let them sit in the fridge for 30 minutes to 1 hour to defrost slightly before serving. They keep well in the fridge for up to 3 days or in the freezer for up to 1 month. Always allow them to defrost before serving.
Nutrition Facts
Servings: 6 ServingCalories:221.43kcalTotal Fat:13.73gCholesterol:9.54mgSodium:38.83mgPotassium:174.88mgTotal Carbohydrate:22.89gDietary Fiber: 2.22gSugars: 20.33gProtein:3.02gVitamin A: 10.11IUVitamin C: 9mgCalcium: 98.28mgIron: 0.31mgVitamin D: 0.02IUVitamin E: 1.13IUVitamin K: 7.56mcgVitamin B6: 0.04mgVitamin B12: 0.26mcgPhosphorus: 86.21mgMagnesium: 13.93mgZinc: 0.5mg
Note
- Silicone mould: You can use any silicone mould, not just a raspberry-shaped one. The shape does not affect the recipe, only the final look. Just make sure the cavities are not too large, as smaller shapes hold better and are easier to remove.
- Chocolate choice: White chocolate is used here for the pink colour effect, but you can easily substitute it with milk or dark chocolate. If you skip the colouring, the recipe works exactly the same.
- Colouring: Always use oil-based food colouring for chocolate. Water-based colours will cause the chocolate to seize and become grainy.
- Building the shell: Do not skip the layering. Applying 2 to 3 thin layers and chilling between each is key to creating a strong shell that will not break when removing from the mould.
- Edges matter: Pay extra attention to the top edges of each cavity when coating with chocolate. Weak edges are the most common reason the shells crack during unmoulding.
- Chocolate consistency: Let the chocolate cool slightly before coating. If it is too hot and runny, it will not stick properly to the mould and will create thin, uneven shells.
- Yogurt texture: Use thick yogurt. If your yogurt is too loose, strain it beforehand. A runny filling can affect both texture and structure.
- Mixing the filling: Mix the raspberries and yogurt very gently, just enough to coat them. Keep the berries mostly whole.
- Filling and sealing: Do not overfill the mould. Leave enough space to seal properly with the remaining chocolate. Make sure the edges are fully sealed to avoid leaks and to ensure easy removal.
- Freezing: The full freezing time is important. If the filling is not fully frozen, the shapes may collapse or stick when removing from the mould.
- Unmoulding: Remove gently by pressing from the bottom of the silicone mould. If the chocolate feels too firm and cracks, let it sit at room temperature for a minute before trying again.
- Serving: These are best enjoyed slightly defrosted. Straight from the freezer they will be too firm, but after 30 to 60 minutes in the fridge, the centre becomes creamy and smooth.
- Storage: Store in the fridge for up to 3 days or in the freezer for up to 1 month. If freezing longer, keep them covered to prevent freezer odours. Always defrost before serving.
- Finish: Edible gold dust is optional, but it adds a premium finish and highlights the raspberry texture beautifully.