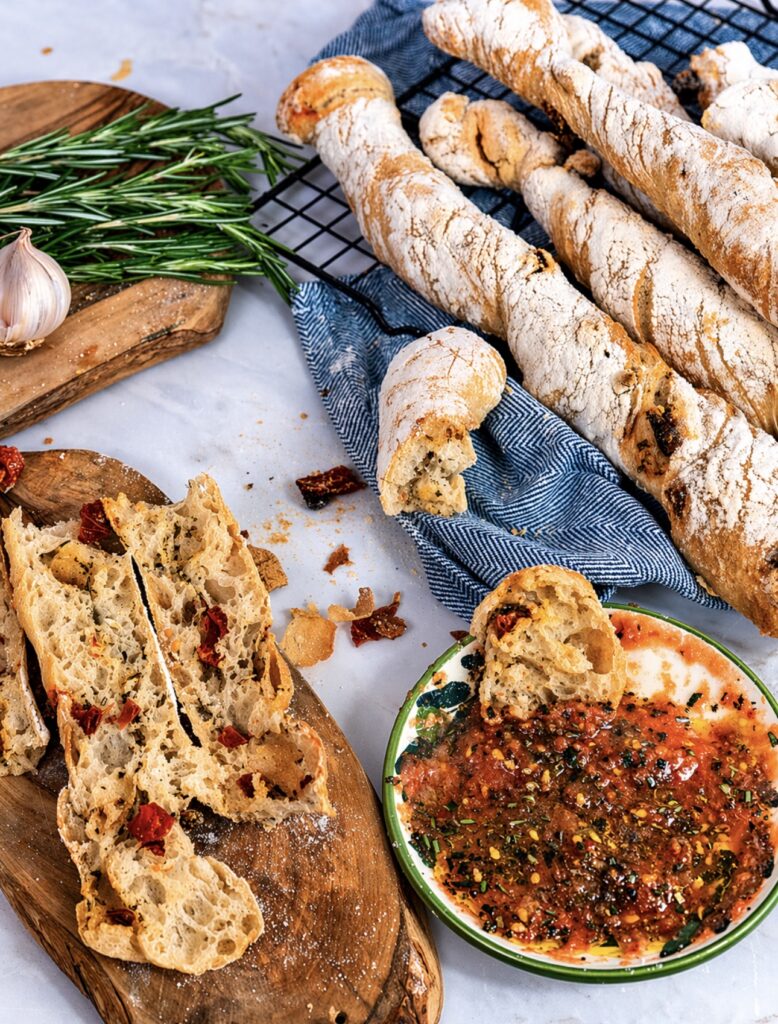

No-Knead Sun-Dried Tomato and Rosemary Bread Twists: Crispy, Rustic, and Effortlessly Impressive
There is something incredibly satisfying about baking your own bread, especially when it looks and tastes like it came straight from a bakery. These No-Knead Sun-Dried Tomato and Rosemary Bread Twists deliver exactly that with minimal effort. They bake up with a golden, crisp crust and a soft, airy interior, packed with rich flavour from sun-dried tomatoes and fragrant rosemary. The no-knead method keeps things simple while still giving you that artisan-style result at home. If you enjoy easy bread recipes, you might also love my Easy No-Knead Ciabatta (4 Ingredients) or serve these alongside Easy Roasted Pepper Hummus for the perfect combination.

Scroll down or tap ‘Jump to Recipe’ for the full printable recipe card with exact measurements.
Simple Ingredients, Big Flavours
What makes these bread twists so special is how a handful of simple ingredients come together to create something truly impressive. Each element plays its role:
- Bread flour – Builds structure and gives you that chewy, airy crumb.
- Instant yeast – Keeps the process simple and approachable while still delivering a great rise.
- Sun-dried tomatoes – Add a deep, slightly sweet and tangy flavour that runs through every bite.
- Fresh rosemary – Brings a fragrant, earthy note that pairs beautifully with the tomatoes.
- Salt – Essential for enhancing and balancing the flavours.
- Olive oil (for dipping) – Adds richness and ties everything together when serving.
If you enjoy baking with simple ingredients like this, you might also love my Easy Homemade Soft Pretzels or pair these twists with the Delicious Roasted Red Pepper and Feta Dip Recipe for an easy but seriously impressive spread.
How to Make No-Knead Sun-Dried Tomato and Rosemary Bread Twists
Prepare the Dough
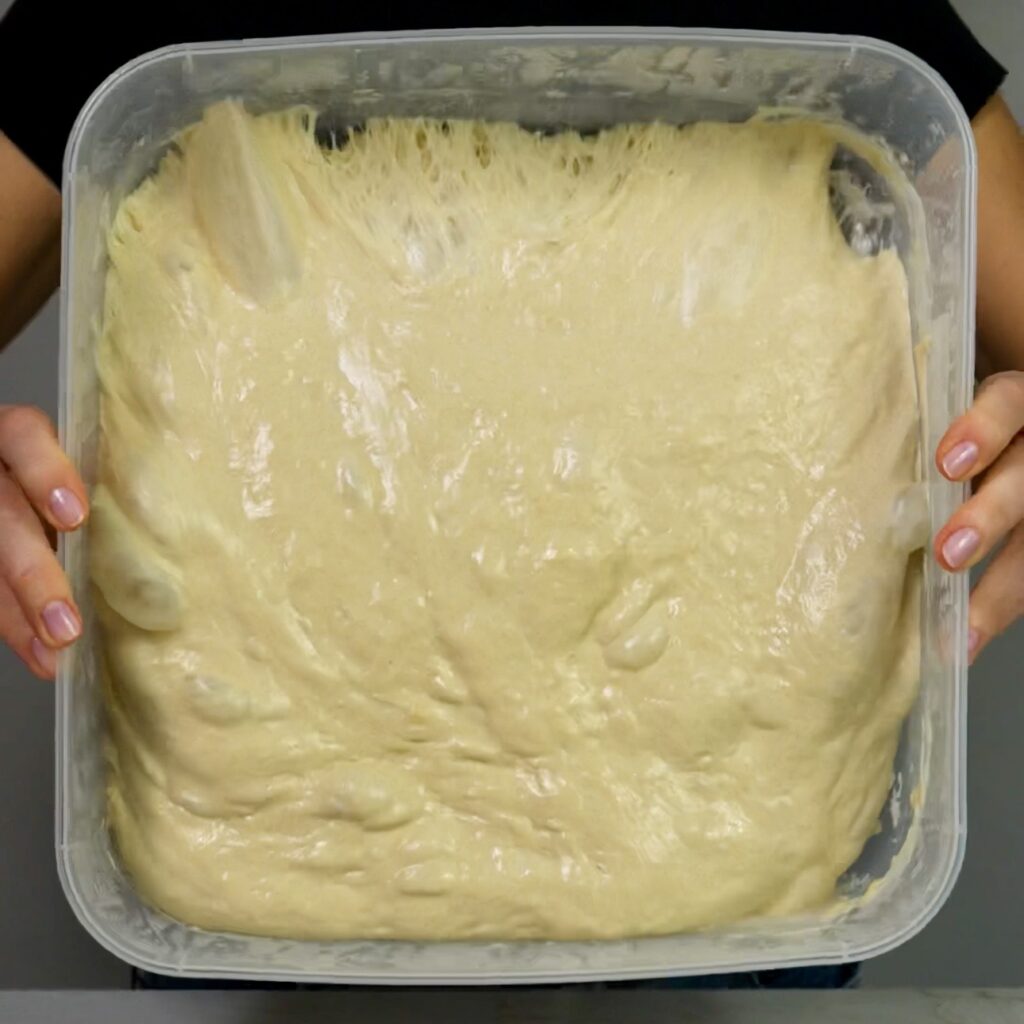
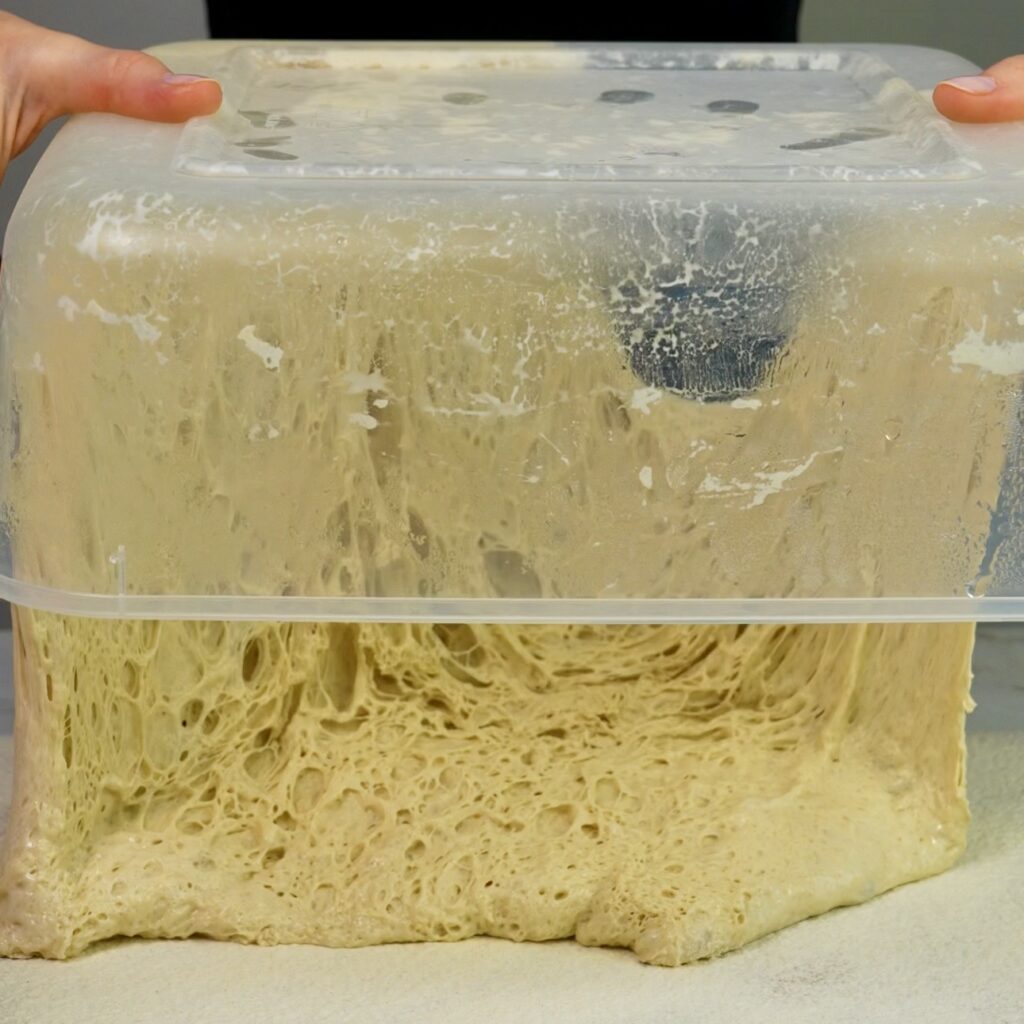
In a square container, combine the lukewarm water, yeast, and salt. A square container makes shaping easier later, but a regular bowl will also work. Add the flour and mix with a spoon until fully combined and no dry patches remain. Cover with a lid or cling film and let it rest for 30 minutes. Now begin the stretch and fold process. Take one side of the dough, gently stretch it upwards, then fold it over to the opposite side. Repeat this with all four sides, then cover and let the dough rest for another 30 minutes. Repeat this process 3 more times, for a total of 4 rounds of stretch and folds, resting the dough for 30 minutes between each round. After the final round, cover the container and place it in the fridge overnight, or for a minimum of 8 hours.
Shape the Twists
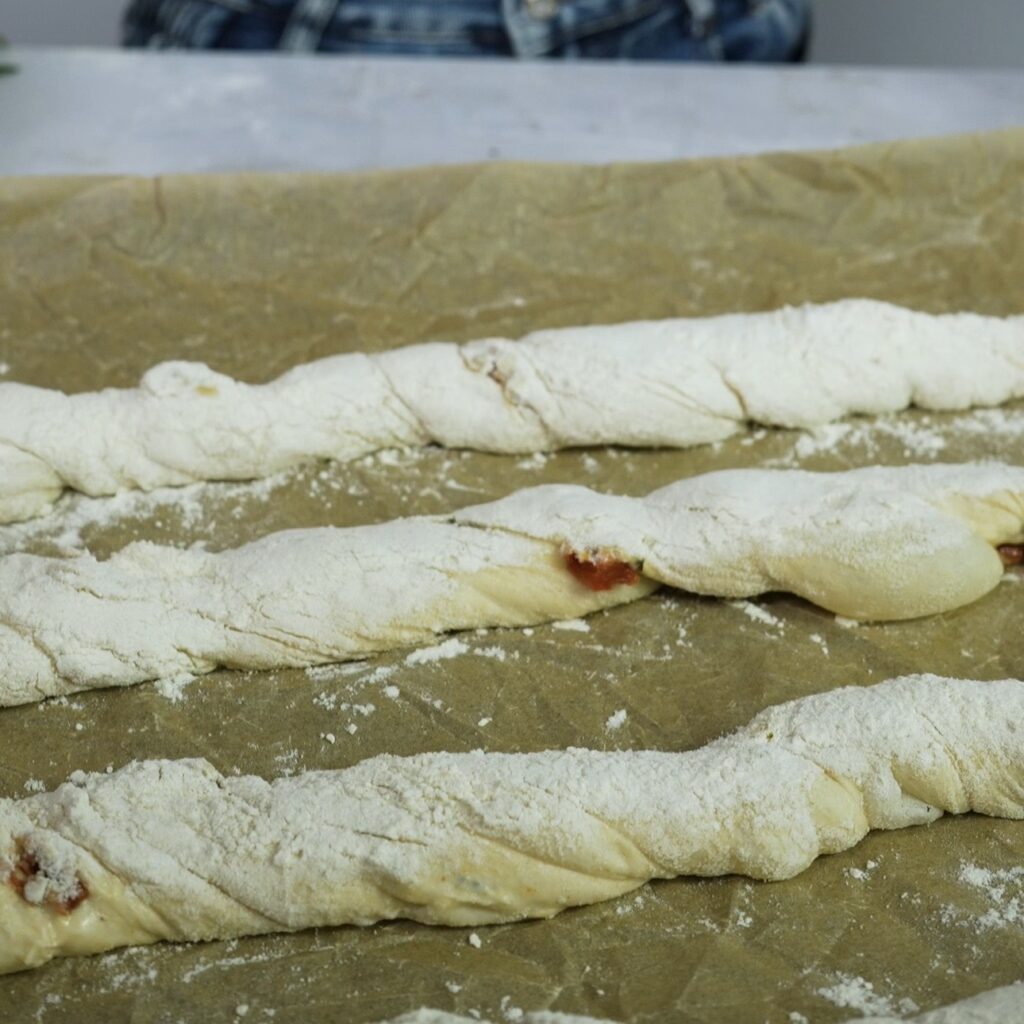
When ready to shape, generously dust a clean, flat working surface with flour using a fine sieve, making sure it is fully covered to prevent sticking. Prepare one large or two smaller kitchen towels and dust them generously with flour as well, ensuring there are no gaps, otherwise the dough will stick. Remove the dough from the fridge, take off the lid, and turn the container upside down over the floured working surface so the dough falls directly onto it. It should release easily, just be patient.
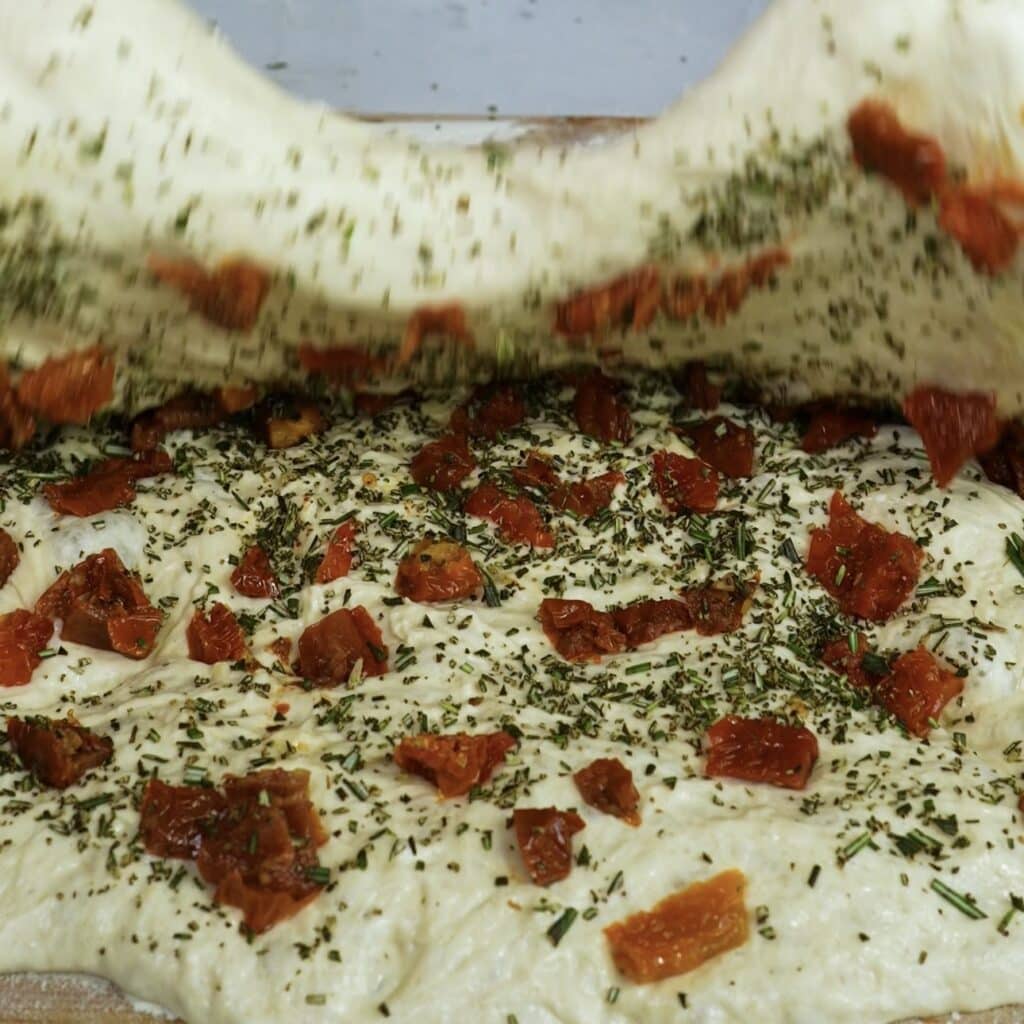
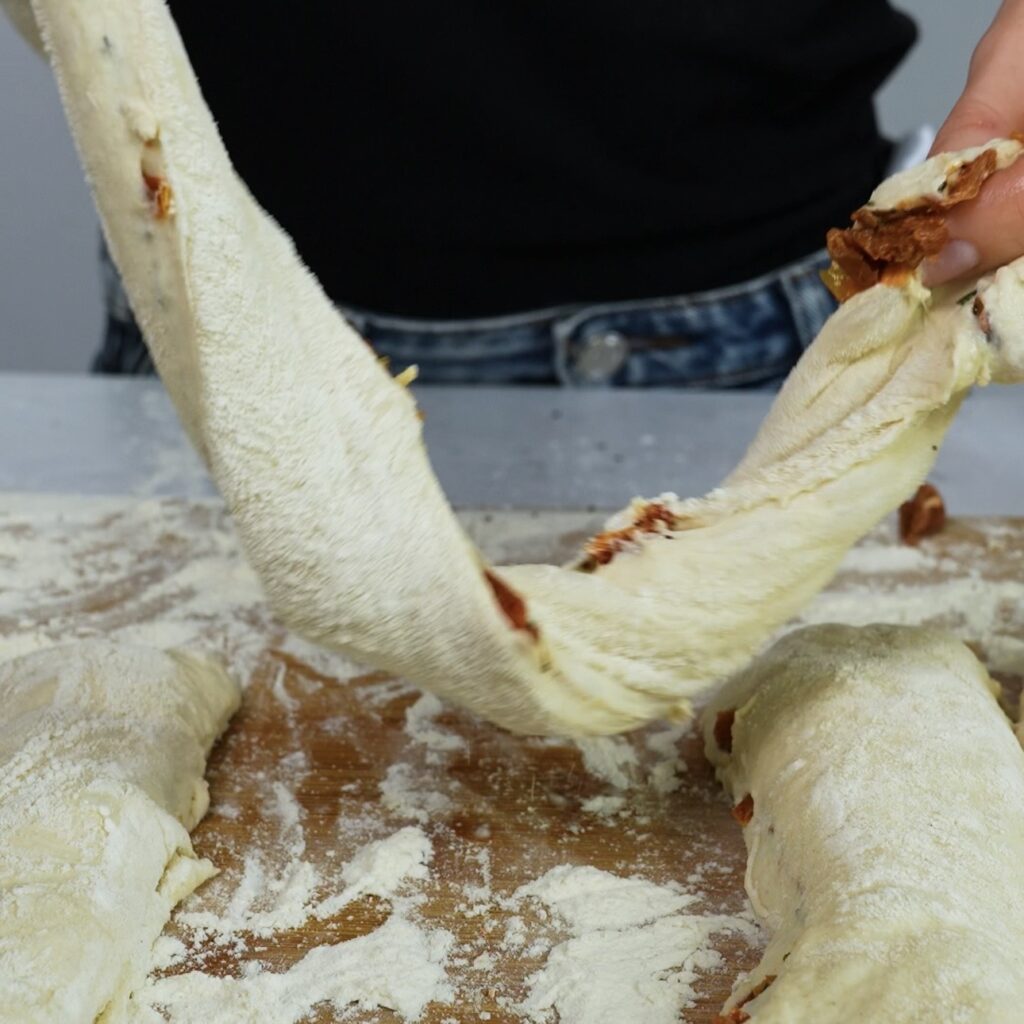
Lightly wet your hands and, working quickly, spread and tidy the dough into a square shape. This is where the square container helps. Sprinkle the dough with the chopped sun-dried tomatoes and rosemary, then fold the dough in half to enclose the filling.
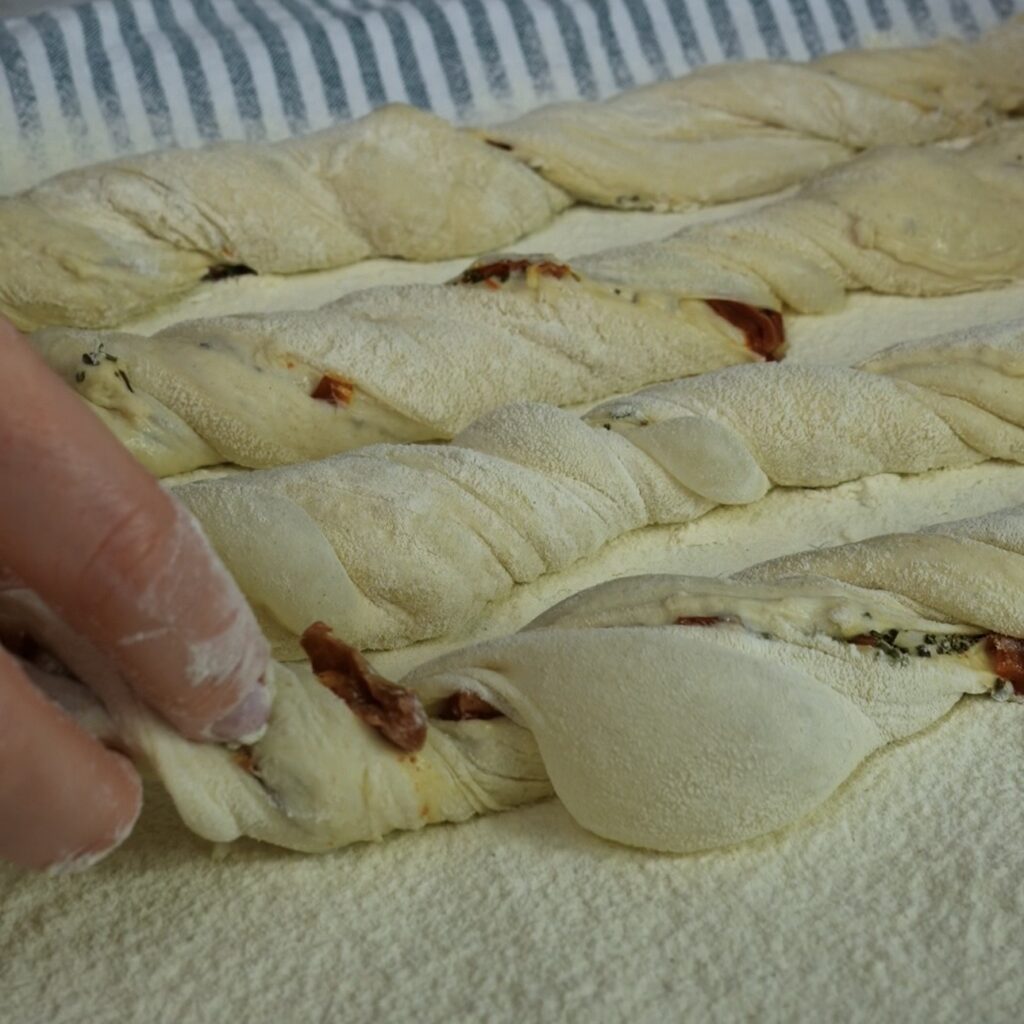
Tighten it again quickly with your hands into a rectangle shape, then use a dough scraper to cut it into 6 equal parts. Gently lift one piece, twist it a few times, and transfer it to your prepared towel. Repeat with the remaining dough. The dough will be very soft, so you need to work quickly and with well-dusted hands.
Alternatively, you can twist the dough pieces straight on the work surface and then transfer them to the prepared towel. Cover the twisted dough with a clean kitchen towel and leave it for the final proof for 20 minutes.
Bake
Preheat the oven to 220°C / 430°F with the fan on and line a baking tray with parchment paper. Place another empty tray at the bottom of the oven. You may need to bake them in batches. Using your hands, gently transfer the dough to the prepared tray, flipping it so the top becomes the bottom.
Place the tray in the oven and immediately throw a handful of ice cubes onto the bottom tray, or pour in about 1 cup of water if you do not have ice. This creates steam, allowing the bread to rise quickly before the crust sets. Bake for 17 to 20 minutes, or until deep golden brown, keeping in mind that timing may vary depending on your oven. Remove from the oven and let the bread cool on a wire rack. Repeat with the remaining dough if needed. Allow the bread to cool before eating, as it continues to cook slightly after baking.

Make the Dipping Oil
While the bread is baking, prepare a quick dipping oil. Finely grate the garlic and tomato, discarding the tomato skin, then add the chopped rosemary, a pinch of salt, and the olive oil. Mix well until combined. Serve alongside the warm twists and dip generously.

Why We Love These Bread Twists
These twists are everything you want from homemade bread. They are simple to make, require minimal hands-on time, and deliver that perfect contrast between a crisp crust and a soft, airy interior. The combination of sun-dried tomatoes and rosemary brings a bold, savoury flavour that makes them stand out from classic plain bread. They are also incredibly approachable. The no-knead method removes the need for complicated techniques, making this recipe suitable for all skill levels. At the same time, the result feels elevated and bakery-quality, which makes it even more satisfying. Another reason to love them is how versatile they are. Serve them warm as a snack, alongside soups, like my High-Protein Cauliflower Basil Soup or Pea and Mint Soup. You can also serve them as part of a sharing board paired with my Beetroot and Feta Dip and Roasted Tomato and Garlic Labneh Dip for an easy but impressive spread.
Perfect for Any Occasion
These No-Knead Sun-Dried Tomato and Rosemary Bread Twists are incredibly flexible when it comes to serving. They work just as well as a simple snack as they do as part of a more styled table. Serve them warm straight from the oven with the dipping oil, or pair them with something like my Roasted Garlic Dip for an extra layer of flavour. They are a great addition to casual gatherings, weekend lunches, or even as a side for a cosy dinner. Add them to a sharing board, or serve alongside mains likeGrilled Chipotle Chicken with Mango Salsa or Grilled Harissa Chicken with Veggies for a more complete meal. They are also practical. You can prepare the dough ahead of time, bake when needed, and even reheat them briefly to bring back that fresh, crisp texture. Whether you are feeding a crowd or just want something homemade to elevate a simple meal, these twists fit in effortlessly.
Instagram Tutorial & More
Want to see how these twists come together? Watch our quick video tutorial on Instagram and don’t miss out on our other easy and delicious recipes.
If you enjoyed this recipe, try:
- Creamy Passion Fruit Curd Doughnuts
- Easy No-Knead Ciabatta (4 Ingredients)
- Leftover Chicken Ciabatta Sandwich
- Braised Beef Shanks
- Roasted Parsnip Soup
- Roasted Butternut Squash and Pear Soup with Gorgonzola
- Stuffed Tomatoes with Béchamel Sauce
Scroll down to the printable recipe card for full measurements and step-by-step instructions.
Happy baking,
Izabella
Description
These no-knead sun-dried tomato and rosemary bread twists are golden and crisp on the outside, with a soft, airy crumb inside. The dough comes together with minimal effort and develops flavour through a slow overnight rise, giving you that bakery-style texture at home. Each twist is packed with savoury sun-dried tomatoes and fragrant rosemary, making them perfect for sharing. They are slightly rustic in shape, which adds to their charm and keeps the process simple. Served warm with a quick garlic, tomato, and rosemary dipping oil, they are hard to resist straight out of the oven. Perfect as a snack, side, or appetiser.
Ingredients
For the dough
For the dipping oil
Instructions
-
Prepare the Dough: In a square container, combine the lukewarm water, yeast, and salt. A square container makes shaping easier later, but a regular bowl will also work. Add the flour and mix with a spoon until fully combined and no dry patches remain. Cover with a lid or cling film and let it rest for 30 minutes. Now begin the stretch and fold process. Take one side of the dough, gently stretch it upwards, then fold it over to the opposite side. Repeat this with all four sides, then cover and let the dough rest for another 30 minutes. Repeat this process 3 more times, for a total of 4 rounds of stretch and folds, resting the dough for 30 minutes between each round. After the final round, cover the container and place it in the fridge overnight, or for a minimum of 8 hours.
-
Shaping: When ready to shape, generously dust a clean, flat working surface with flour using a fine sieve, making sure it is fully covered to prevent sticking. Prepare one large or two smaller kitchen towels and dust them generously with flour as well, ensuring there are no gaps, otherwise the dough will stick. Remove the dough from the fridge, take off the lid, and turn the container upside down over the floured working surface so the dough falls directly onto it. It should release easily, just be patient. Lightly wet your hands and, working quickly, spread and tidy the dough into a square shape. This is where the square container helps. Sprinkle the dough with the chopped sun-dried tomatoes and rosemary, then fold the dough in half to enclose the filling. Tighten it again quickly with your hands into a rectangle shape, then use a dough scraper to cut it into 6 equal parts. Gently lift one piece, twist it a few times, and transfer it to your prepared towel. Repeat with the remaining dough. The dough will be very soft, so you need to work quickly and with well-dusted hands. Alternatively, you can twist the dough pieces straight on the work surface and then transfer them to the prepared towel. Cover the twisted dough with a clean kitchen towel and leave it for the final proof for 20 minutes.
-
Baking: Preheat the oven to 220°C / 430°F with the fan on and line a baking tray with parchment paper. Place another empty tray at the bottom of the oven. You may need to bake them in batches. Using your hands, gently transfer the dough to the prepared tray, flipping it so the top becomes the bottom. Place the tray in the oven and immediately throw a handful of ice cubes onto the bottom tray, or pour in about 1 cup of water if you do not have ice. This creates steam, allowing the bread to rise quickly before the crust sets. Bake for 17 to 20 minutes, or until deep golden brown, keeping in mind that timing may vary depending on your oven. Remove from the oven and let the bread cool on a wire rack. Repeat with the remaining dough if needed. Allow the bread to cool before eating, as it continues to cook slightly after baking.
-
Make the dipping oil: While the bread is baking, prepare a quick dipping oil. Finely grate the garlic and tomato, discarding the tomato skin, then add the chopped rosemary, a pinch of salt, and the olive oil. Mix well until combined. Serve alongside the warm twists and dip generously.
Nutrition Facts
Servings: 6 ServingCalories:301.55kcalTotal Fat:3.88gCholesterol:0mgSodium:377.46mgPotassium:559.91mgTotal Carbohydrate:56.83gDietary Fiber: 3.76gSugars: 5.45gProtein:10.45gVitamin A: 14.69IUVitamin C: 7.95mgCalcium: 30.31mgIron: 4.2mgVitamin D: 0IUVitamin E: 0.7IUVitamin K: 8.56mcgVitamin B6: 0.1mgVitamin B12: 0mcgPhosphorus: 122.54mgMagnesium: 44.88mgZinc: 0.95mg
Note
Recipe Notes
- Use lukewarm water, not hot: The water should feel just slightly warm to the touch. Too hot and it will kill the yeast, too cold and the dough will be slow to rise.
- Dough will be very soft and sticky: This is exactly what you want. Do not add extra flour. The high hydration is what gives you that airy crumb and light texture.
- Square container makes a difference: It is not essential, but it helps the dough naturally form a square, which makes shaping much easier later.
- Do not skip the stretch and folds: This step replaces kneading. It builds structure and strength in the dough, so the bread holds its shape and rises properly.
- Overnight rest = better flavour: The longer, slow fermentation in the fridge develops flavour and improves texture. If you are short on time, you can proof at room temperature, but the result will be less complex.
- Work quickly when shaping: The dough is delicate and soft. The longer you handle it, the more it will stick and lose structure. Dust your hands well and keep it moving.
- Rustic is perfect here: Do not worry about making the twists uniform. Uneven shapes are part of the charm and give you those lovely crispy edges.
- Flour your towels generously: Any gaps without flour will cause sticking. Be generous here, this step saves frustration later.
- Steam is key for a good crust: Adding ice or water to the hot tray creates steam, which helps the bread rise quickly and gives you a crisp, golden crust.
- Flip before baking: Turning the dough so the bottom becomes the top gives you a more rustic, textured finish.
- Bake until deeply golden: Do not take them out too early. A deep golden colour means better flavour and a crisp exterior.
- Let them cool slightly before eating: As tempting as it is, the bread continues to cook inside after baking. Cutting too early can make it slightly gummy.
- Dipping oil tip: Use a ripe, juicy tomato for the best flavour, and serve the oil fresh. It pairs perfectly with the warm twists.