
Frozen Grape Yogurt Chocolate Bars: Creamy, Refreshing and Naturally Sweet
If you love easy frozen treats that look stunning and taste even better, these Frozen Grape Yogurt Chocolate Bars are about to become your new obsession. They combine creamy yogurt, naturally sweet dates and juicy grapes. All wrapped in a crisp chocolate shell that snaps perfectly with every bite. It’s one of those recipes that feels indulgent but is made with simple, wholesome ingredients, making it perfect for a lighter dessert or a refreshing snack. This recipe fits beautifully alongside my other fruity frozen favourite like Frozen Strawberry Yogurt Gems, where fresh fruit and creamy bases come together in the most satisfying way. If you enjoyed those, this grape version brings a slightly different texture and sweetness that makes it just as irresistible.
Scroll down or tap ‘Jump to Recipe’ to get started.
Simple Ingredients, Big Flavour
What makes these frozen yogurt bars so special is how a handful of simple, carefully chosen ingredients come together to create something that looks elegant and tastes incredible. Each element has a clear role:
- Full-fat yogurt – This is the foundation of the recipe, giving the bars their creamy, smooth texture once frozen. It helps avoid an icy consistency and creates that rich, almost dessert-like finish. If you enjoy creamy frozen textures, you might also like my Frozen Blueberry Ricotta Pops, which offer a similar softness with a slightly more delicate flavour.
- Dates – Medjool dates work best here, as they are naturally soft, sticky and rich in flavour. They blend seamlessly into the yogurt, adding sweetness without refined sugar and helping to thicken the mixture. If you like using dates in desserts, my Cottage Cheese Date Bites are another great option, combining natural sweetness with a creamy base.
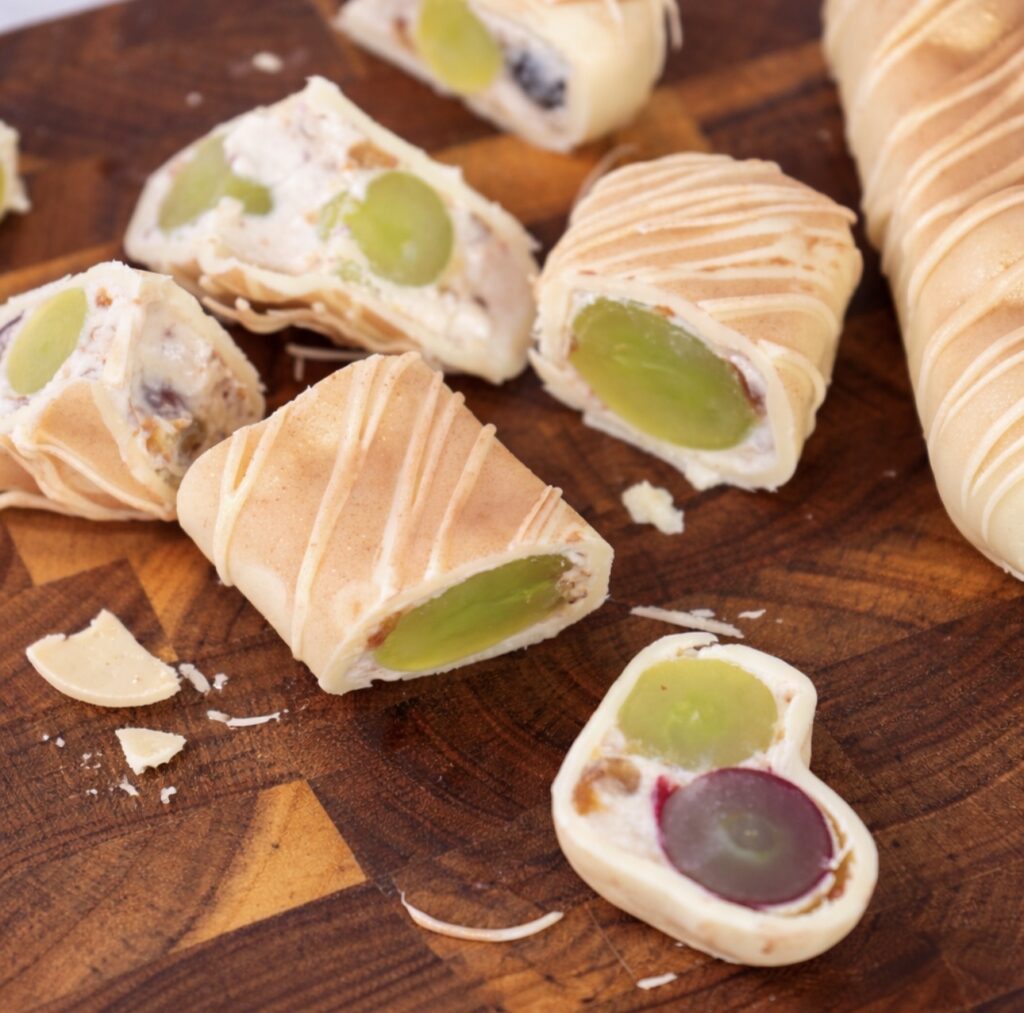
- Grapes – The star of the recipe. Choose firm, seedless grapes for the best texture, and for a more striking visual effect, use a mix of red and green grapes. They add bursts of freshness and juiciness that contrast beautifully with the creamy yogurt base.
- Lemon zest – A small but essential addition. It lifts the flavour, balancing the sweetness from the dates and chocolate, and adds a subtle freshness that keeps the bars from feeling too heavy.
- Chocolate and neutral oil – Use good-quality cooking chocolate here, such as Callebaut or a high-quality Swiss or Belgian chocolate. It makes a noticeable difference in both taste and texture. The added oil helps create a smooth, glossy coating that sets evenly with a clean snap. Make sure to use a neutral oil with no strong flavour, such as sunflower or light olive oil, so it doesn’t interfere with the taste of the chocolate.
How to Make Frozen Grape Yogurt Bars
Prepare the Yogurt Base
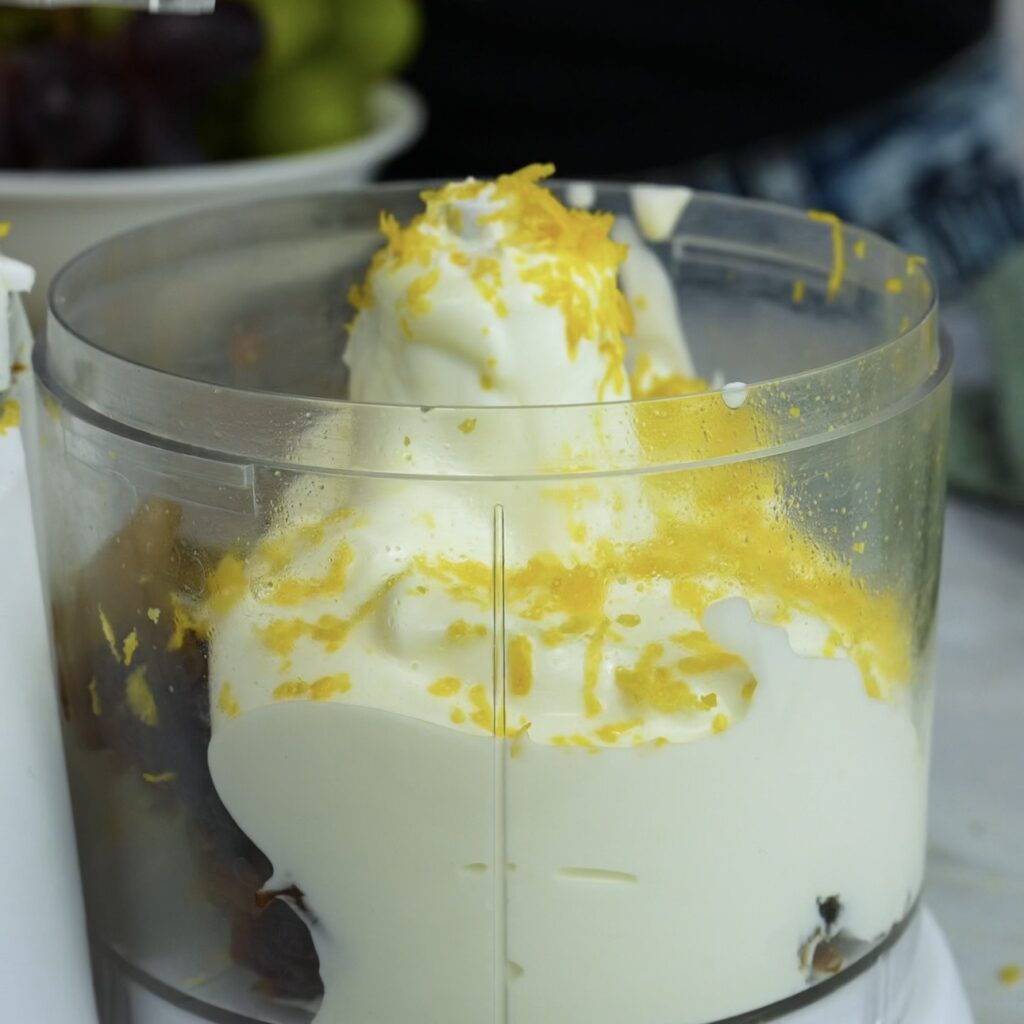
Start by adding the pitted dates, yogurt and lemon zest to a food processor. Blend until completely smooth and creamy, making sure there are no visible pieces of dates left. The mixture should be thick, silky and evenly combined, as this will form the base of your bars.
Add the Grapes
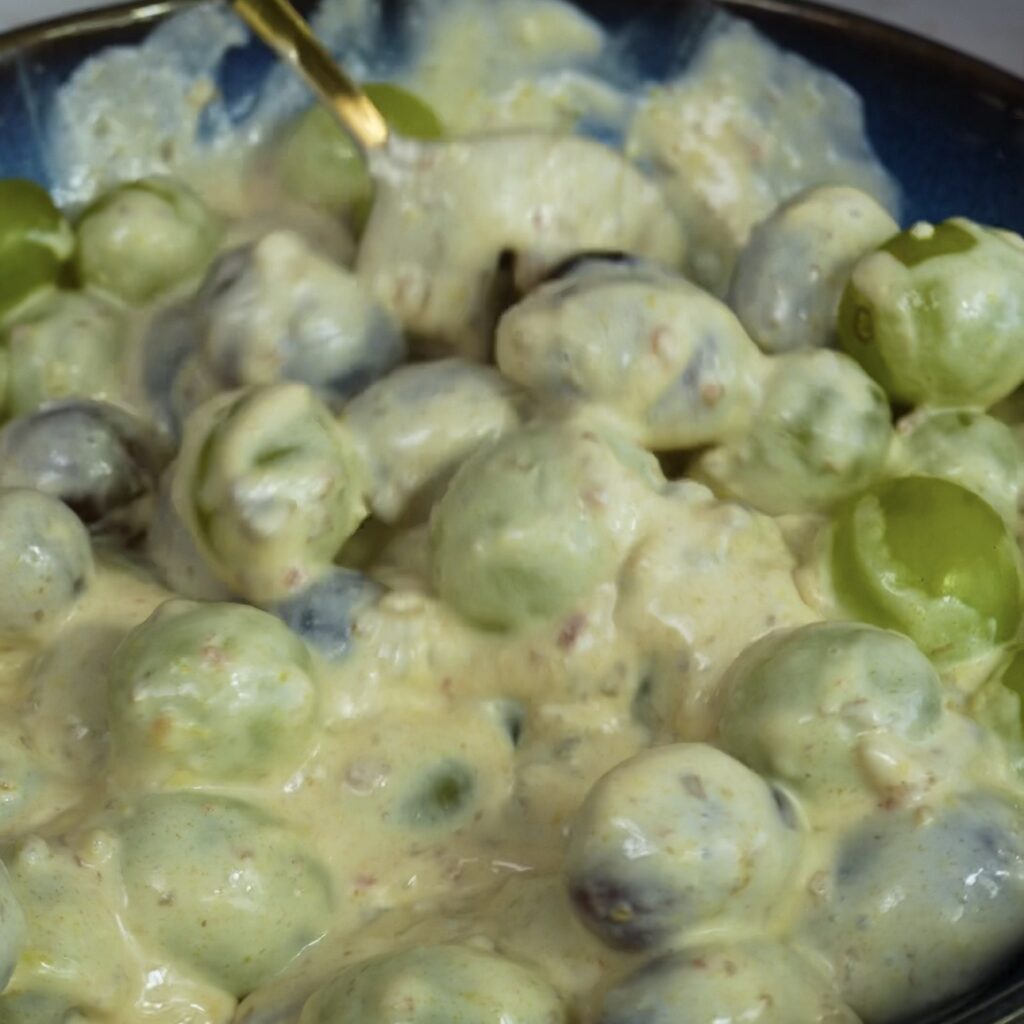
Transfer the yogurt mixture to a bowl and add the grapes. Gently fold until all the grapes are evenly coated. Take your time here to ensure the fruit is well distributed throughout the mixture, which will give a balanced texture in every bite.
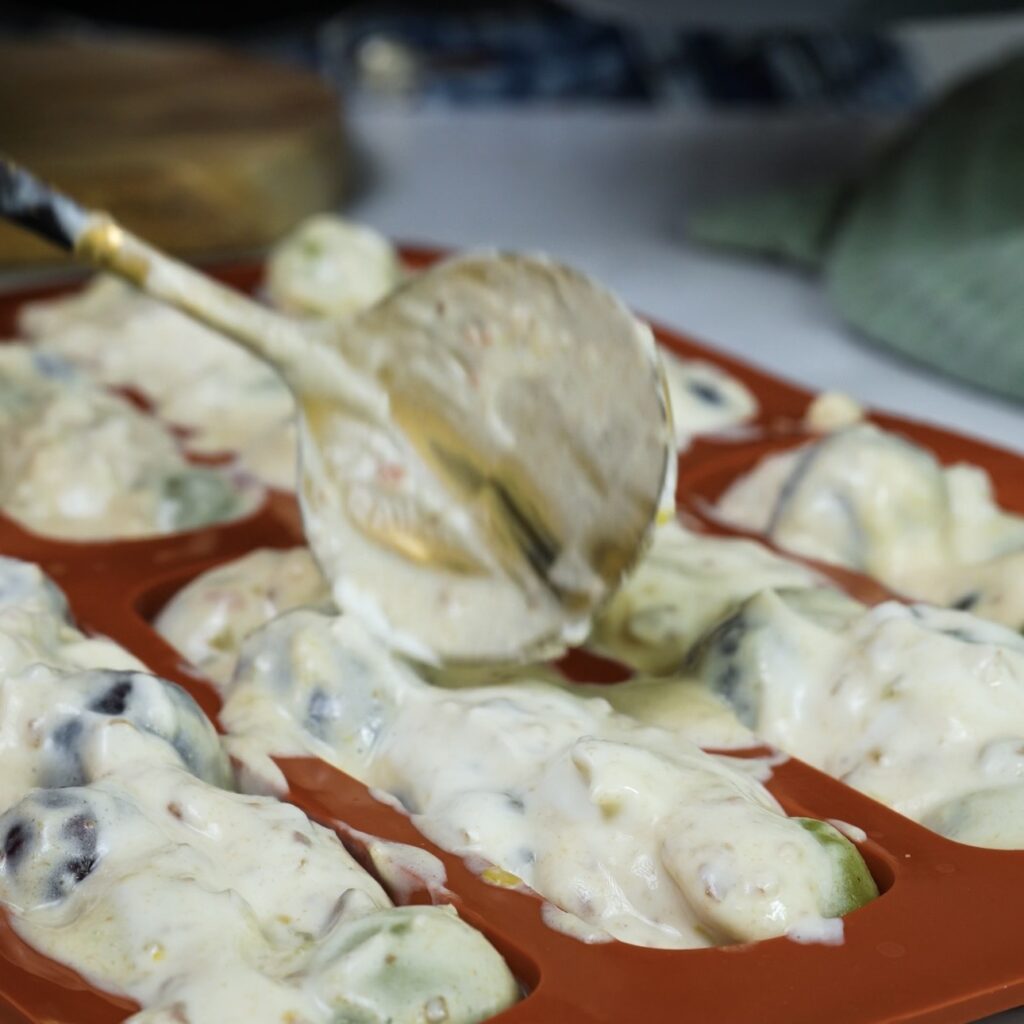
Fill the Moulds and Freeze
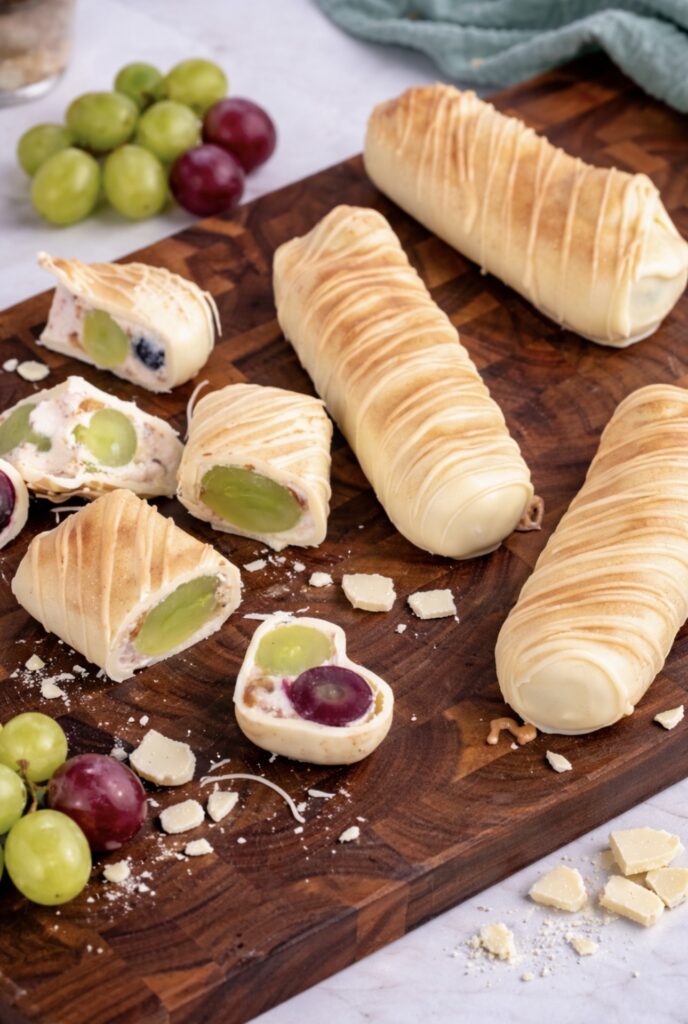
Spoon the mixture into silicone moulds, ideally long ice cube moulds measuring around 11 x 2 cm (approximately 4.3 x 0.8 inches). These create clean, bar-shaped portions that are perfect for dipping. You can use any mould you have on hand. Don’t worry if some grapes stick out over the edges, as this creates a beautiful, textured finish once coated. Place the moulds in the freezer for at least 4 hours, or until fully frozen. For best results, leave them overnight so they are completely firm and easy to handle.
Melt the Chocolate
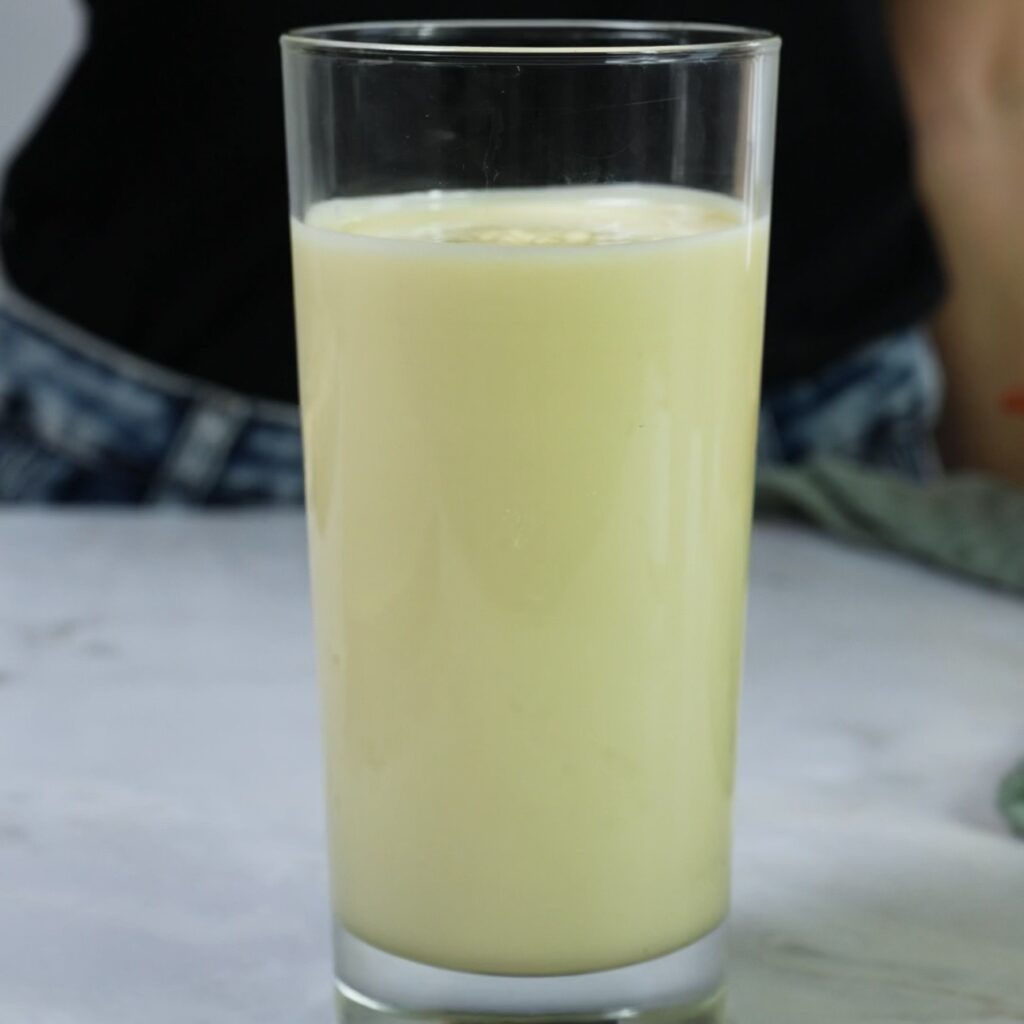
When you are ready to coat the bars, melt the chocolate using either the microwave or double boiler method. For the microwave, heat the chocolate in short 10 second bursts, stirring well between each interval until fully melted. For the double boiler method, place the chocolate in a heatproof bowl set over gently simmering water, making sure the bowl does not touch the water, and stir continuously until smooth. Once melted, stir in the oil until fully combined and glossy. Allow the chocolate to cool for 10 to 15 minutes so it thickens slightly, which helps it coat the bars more evenly. Pour the chocolate into a tall glass to make dipping easier.
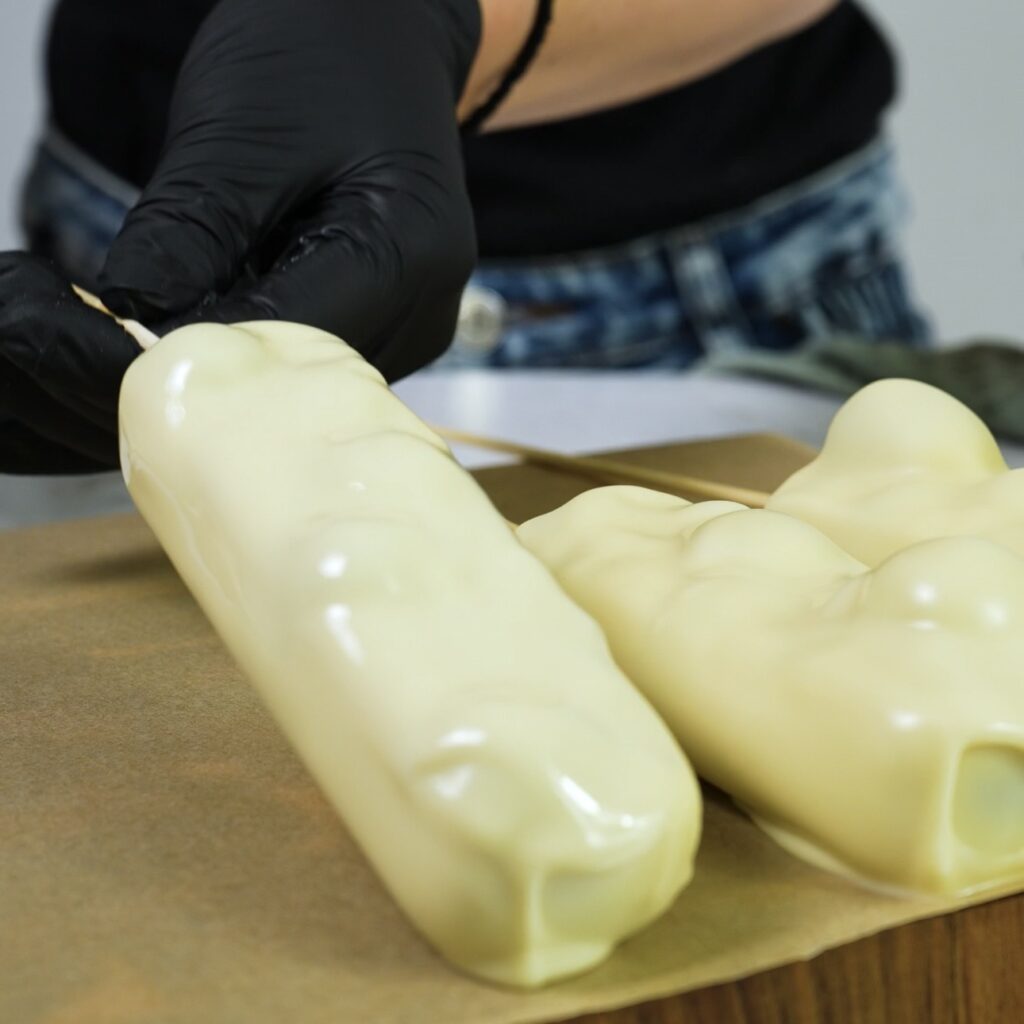
Coat the Bars
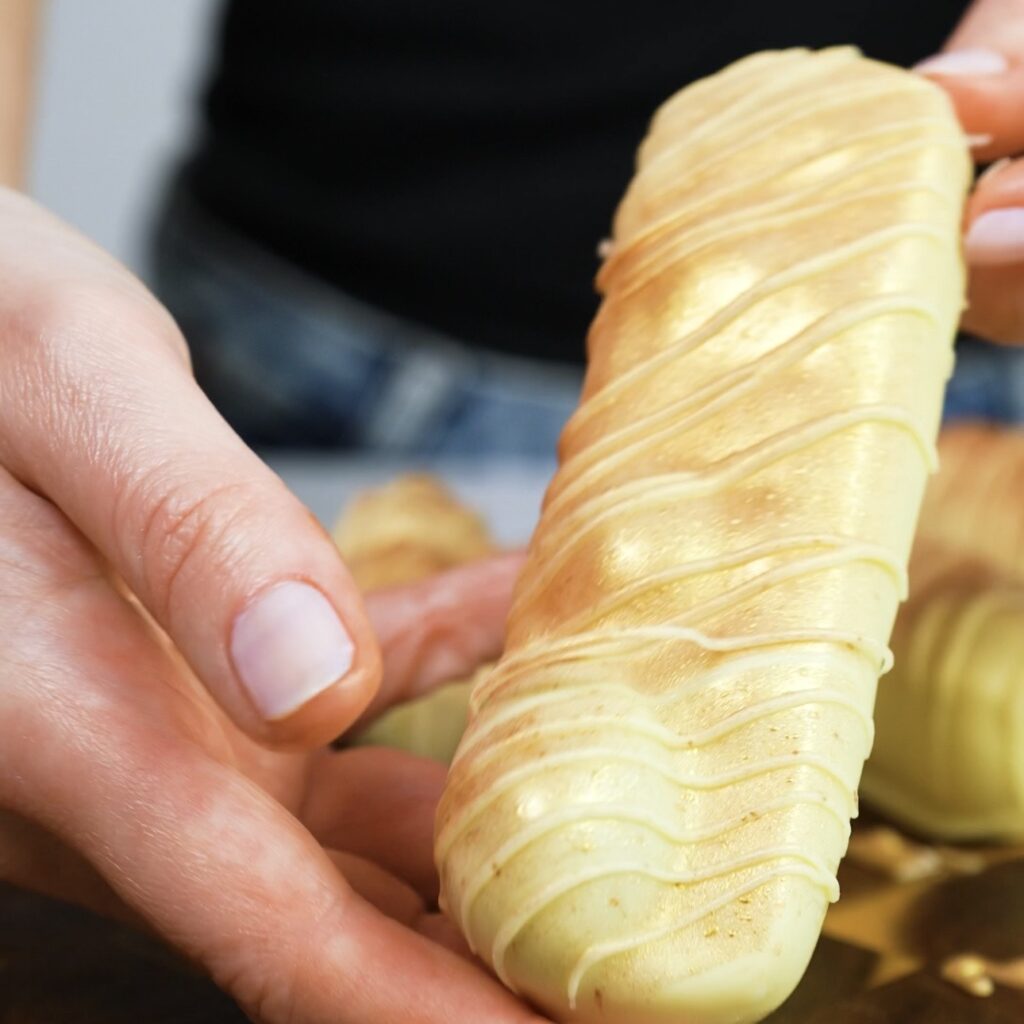
Prepare a tray lined with parchment paper that fits in your fridge. Working quickly and one at a time, remove a bar from the mould and insert a wooden skewer into the side so it is easy to dip into the chocolate. Dip the bar fully into the chocolate, allow the excess to drip off,

then place it onto the prepared tray. Gently twist to remove the skewer. Keep the remaining bars in the freezer while you work to prevent them from softening and forming condensation, as this can affect how the chocolate sets. Repeat with all the bars.
Decorate and Set
Transfer any remaining chocolate into a piping bag, snip a small tip and drizzle over the bars for a decorative finish.
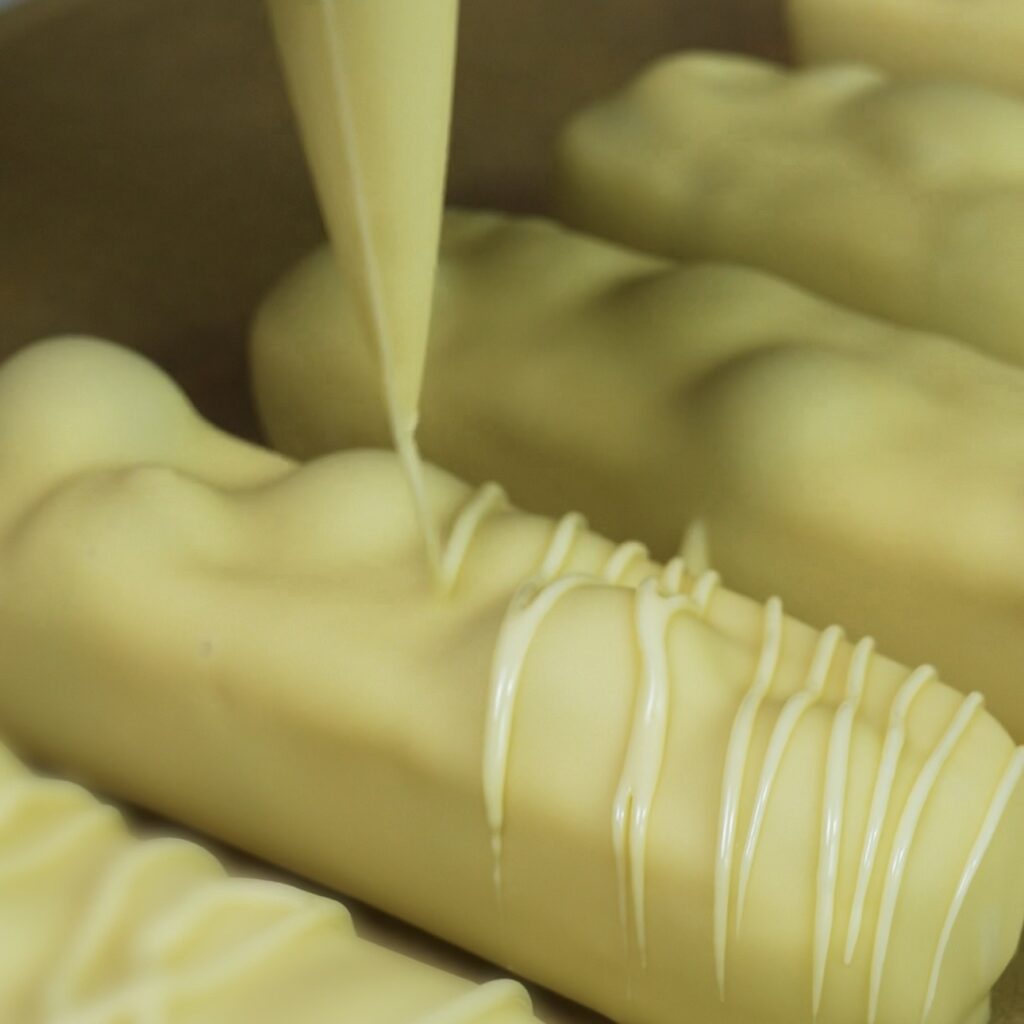
Spray with edible gold dust if desired. Place the tray in the fridge until the chocolate is fully set. If the bars have been out for a while, allow them to sit in the fridge briefly before serving to stabilise the coating and maintain the best texture.
Serving and Enjoying
These Frozen Grape Yogurt Chocolate Bars are best enjoyed slightly chilled rather than straight from the freezer. This allows the centre to soften just enough to become creamy, while the chocolate shell stays crisp and snappy.. They make a perfect light dessert after dinner, a refreshing afternoon snack, or a make-ahead treat for warm days when you want something cool but not too heavy. The combination of juicy grapes, smooth yogurt and chocolate creates a balanced bite that feels indulgent yet fresh. For a lighter, refined sugar-free option, you can skip the chocolate coating altogether. Enjoy them as pure frozen yogurt bars, which are just as delicious and even more refreshing. If you enjoy this kind of simple, fruit-forward dessert, you might also like Mosaic Jelly Domes or Blueberry Cottage Cheese Bites (High Protein, No Refined Sugar), both offering a similarly light and elegant finish.
Why You’ll Love This Recipe
This recipe is all about simplicity meeting great flavour and texture. It uses a handful of wholesome ingredients to create a dessert that looks impressive and tastes even better. No complicated steps or special equipment needed. The natural sweetness from the dates means there is no need for refined sugar. The yogurt keeps the texture creamy and satisfying without feeling heavy.
What makes these bars stand out is the contrast between the soft frozen centre, the bursts of juicy grapes and the crisp chocolate shell, creating a dessert that feels both refreshing and indulgent at the same time. They are also incredibly adaptable, allowing you to experiment with different fruits or shapes depending on what you have available. If you enjoy desserts with a similar balance of texture and flavour, recipes like Easy Banana Ice Cream Bar (No Churn) or Passion Fruit Ricotta Dessert (Syrok) are great to try next, offering a slightly richer or more snack-style variation of the same idea.
Storage
Store the bars in an airtight container lined with parchment paper, arranged in a single layer to prevent sticking and protect the chocolate coating. Keep them refrigerated for up to 3 days, or freeze for up to 1 month for longer storage. If frozen, allow them to sit at room temperature for a few minutes before serving so the texture softens slightly and the flavours come through more clearly. Avoid leaving them out for too long, as condensation can form on the surface and affect the chocolate coating. These bars are perfect for batch preparation. They make it easy to keep a lighter sweet option on hand whenever you need it. If you enjoy stocking your freezer with easy homemade desserts, you can also prepare Picota Cherry Pistachio Chocolate Bar or Cherry Cottage Cheese Ice Cream (High Protein), giving you a variety of refreshing treats to rotate throughout the week.
You May Also Like
Want to see these bars come together? Watch our quick video tutorial on Instagram and don’t miss out on other delicious recipes on our site.
- Easy Banana Ice Cream Bar (No Churn)
- Cottage Cheese Date Bites
- Raspberry Cottage Cheese Bars
- Picota Cherry Pistachio Chocolate Bar
- Cherry Cottage Cheese Ice Cream (High Protein)
- Mosaic Jelly Domes
- Pistachio Snowballs
- Pecan Date Bites
Happy snacking,
Izabella
Description
These frozen grape yogurt bars are a refreshing and easy no-bake treat made with creamy yogurt, naturally sweet dates and juicy grapes. The mixture is frozen into bar shapes, then coated in a smooth, glossy chocolate shell that sets with a satisfying snap. They are light, fruity and perfect for a healthier dessert or snack. Long ice cube moulds work especially well to create neat bar shapes, but any silicone mould can be used. Keep the bars chilled while working to ensure the chocolate sets perfectly. Simple, beautiful and ideal for warm days.
Ingredients
For the bars
For the chocolate coating
Optional decoration
Instructions
-
Add the pitted dates, yogurt and lemon zest to a food processor and blend until completely smooth and creamy. Transfer the mixture to a bowl, add the grapes and gently fold until they are evenly coated. Spoon the mixture into silicone moulds, aiming for bar shapes around 11 cm long and about 2 cm wide (approximately 4.3 x 0.8 inches). Long ice cube moulds work particularly well for bar shapes, but you can use any mould you have. Don’t worry if some grapes stick out over the edges, as this creates a beautiful, textured finish once coated. Place the moulds in the freezer for at least 4 hours, or until fully frozen. For best results, leave them overnight so they are firm and easy to handle.
-
When you are ready to coat the bars, melt the chocolate using either the microwave or double boiler method, then stir in the oil until smooth and glossy. For the microwave, heat in short 10 second bursts, stirring well between each until fully melted. For the double boiler, place the chocolate in a heatproof bowl over gently simmering water, making sure the bowl does not touch the water, and stir until melted. Allow the chocolate to cool for 10 to 15 minutes so it thickens slightly, which helps it coat the bars more evenly, then transfer it into a tall glass for easy dipping.
-
Prepare a tray lined with parchment paper that fits in your fridge. Working quickly and one at a time, remove a bar from the mould and insert a wooden skewer into the side so it is easy to dip into the chocolate. Dip the bar into the chocolate, let the excess drip off, then place it onto the prepared tray and gently twist to remove the skewer. Keep the remaining bars in the freezer while you work to prevent them from softening and forming condensation, as this can affect how the chocolate sets. Repeat with all the bars.
-
Transfer any remaining chocolate into a piping bag, snip a small tip and drizzle over the bars for a decorative finish, then spray with edible gold dust if desired. Place the tray in the fridge until the chocolate is fully set. If the bars have been out for a while, allow them to sit in the fridge briefly before serving to stabilise the coating and maintain the best texture.
Nutrition Facts
Servings: 8 ServingCalories:343.93kcalTotal Fat:19.65gCholesterol:4.87mgSodium:23.37mgPotassium:397.4mgTotal Carbohydrate:47.23gDietary Fiber: 3.99gSugars: 40.25gProtein:3.79gVitamin A: 12.43IUVitamin C: 7.35mgCalcium: 73.5mgIron: 1.72mgVitamin D: 0.03IUVitamin E: 1.15IUVitamin K: 13.79mcgVitamin B6: 0.1mgVitamin B12: 0.13mcgPhosphorus: 111.25mgMagnesium: 64.55mgZinc: 1.01mg
Note
- Use soft, sticky dates such as Medjool for the smoothest texture and natural sweetness. If your dates are slightly dry, soak them in warm water for 5 to 10 minutes, then drain well before blending.
- Full-fat yogurt works best here, as it gives a creamy consistency and helps the mixture hold its shape once frozen. Lower-fat yogurt can make the bars slightly icier and less rich.
- Choose firm, seedless grapes and pat them dry before mixing. Any excess moisture can affect the texture and cause ice crystals to form.
- Silicone moulds are essential for easy removal. Long ice cube moulds (around 11 x 2 cm / 4.3 x 0.8 inches) create the perfect bar shape, but any similar mould will work.
- Freeze the bars until completely solid before coating. If they are even slightly soft, they will be difficult to handle and won’t hold their shape when dipped.
- Always keep the bars in the freezer while working in batches. If left at room temperature, condensation will form on the surface, which can prevent the chocolate from sticking properly and lead to streaky coating.
- Let the melted chocolate cool slightly before dipping. If it’s too hot, it will melt the bars. If it’s too thick, it won’t coat smoothly. The added oil helps create a thinner, glossier coating that sets with a clean snap.
- Using a tall glass for dipping makes coating much easier and gives a more even finish compared to a shallow bowl.
- Work quickly when coating, as the frozen bars will start to soften. If needed, return them briefly to the freezer before continuing.
- For a neater finish, allow excess chocolate to drip off fully before placing the bars on the tray. This prevents pooling at the base.
- Drizzling extra chocolate on top not only adds decoration but also helps cover any small imperfections in the coating.
- Store the bars in a single layer, separated with parchment paper, to prevent them from sticking together and damaging the coating.
- If serving straight from the freezer, let the bars sit for a few minutes at room temperature to soften slightly for the best texture and flavour.