Peach Curd Mini Pavlovas: Light, Elegant Meringue Nests with Fresh Berries
Few desserts feel as light, elegant, and celebratory as pavlova. These Peach Curd Mini Pavlovas combine crisp, airy meringue shells with a soft marshmallow-like centre, filled with silky vanilla cream and bright, fruity peach curd. Finished with fresh berries and a touch of mint, they are delicate, beautiful, and perfect for entertaining. Individual pavlovas are ideal for dinner parties, spring celebrations, or when you simply want a dessert that looks impressive but is surprisingly simple to make. Baking the meringue slowly at a low temperature keeps the shells snow-white and crisp, while the filling brings a lovely balance of creaminess and fruitiness. If you enjoy light fruit desserts like this, you might also love recipes such as Strawberry Ricotta Tartlets, Blueberry Tiramisu Cake, or Nectarine Frangipane Tartlets, which share the same fresh and elegant flavour profile.
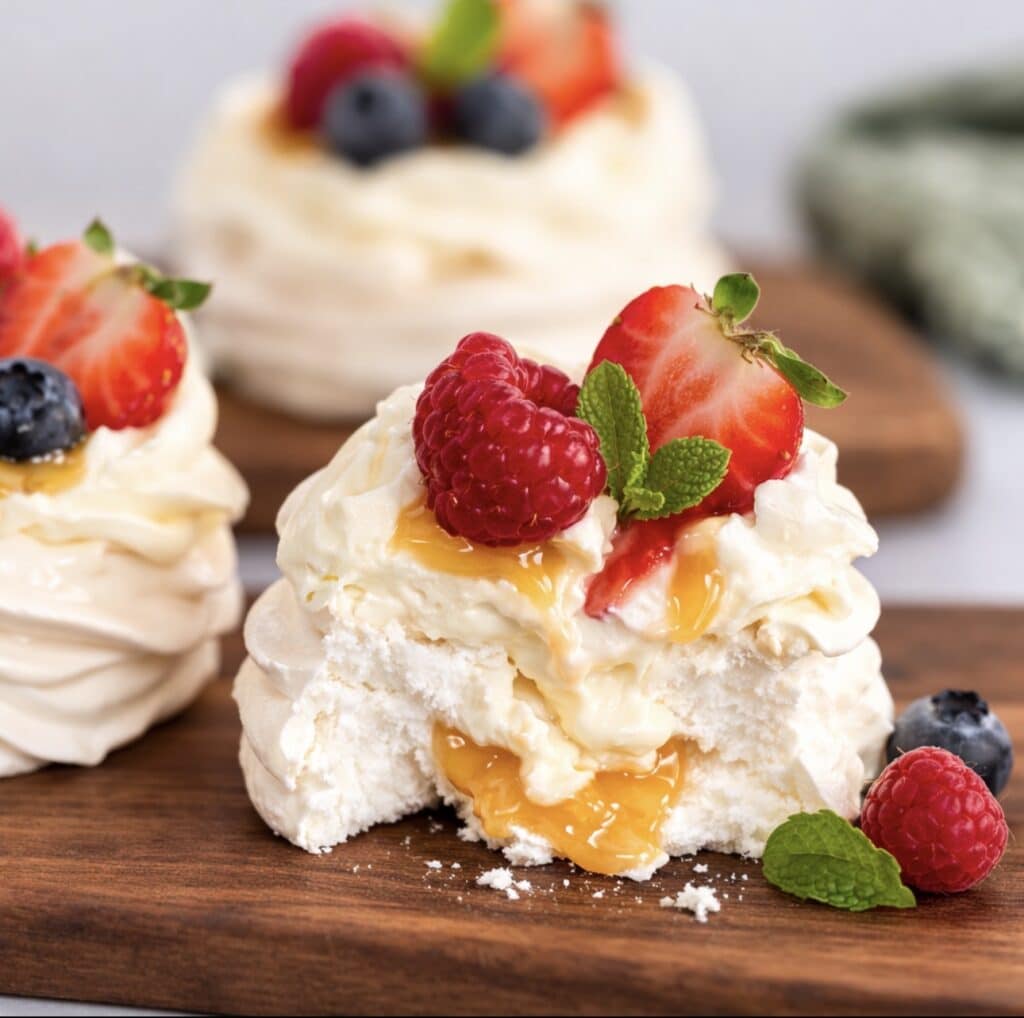
A sliced mini pavlova revealing the soft centre and creamy filling.
Scroll down or tap “Jump to Recipe” to see the full printable recipe card with exact measurements and instructions.
Simple Ingredients, Bright Flavours
Pavlova proves that a handful of simple ingredients can transform into a dessert that feels truly special. Each component contributes to the balance of texture and flavour.
Egg whites – The base of the pavlova. When whipped properly, they form a stable foam that bakes into crisp meringue shells with a soft interior.
Caster sugar – Fine sugar dissolves smoothly into the egg whites, creating the glossy structure pavlovas are known for.
Cornflour and lemon juice – These stabilise the meringue and give pavlova its signature crisp shell and delicate centre.
Cream cheese and double cream – Whipped together, they create a smooth filling that is rich yet light.
Peach curd – Fruity and slightly tangy, it balances the sweetness of the meringue beautifully.
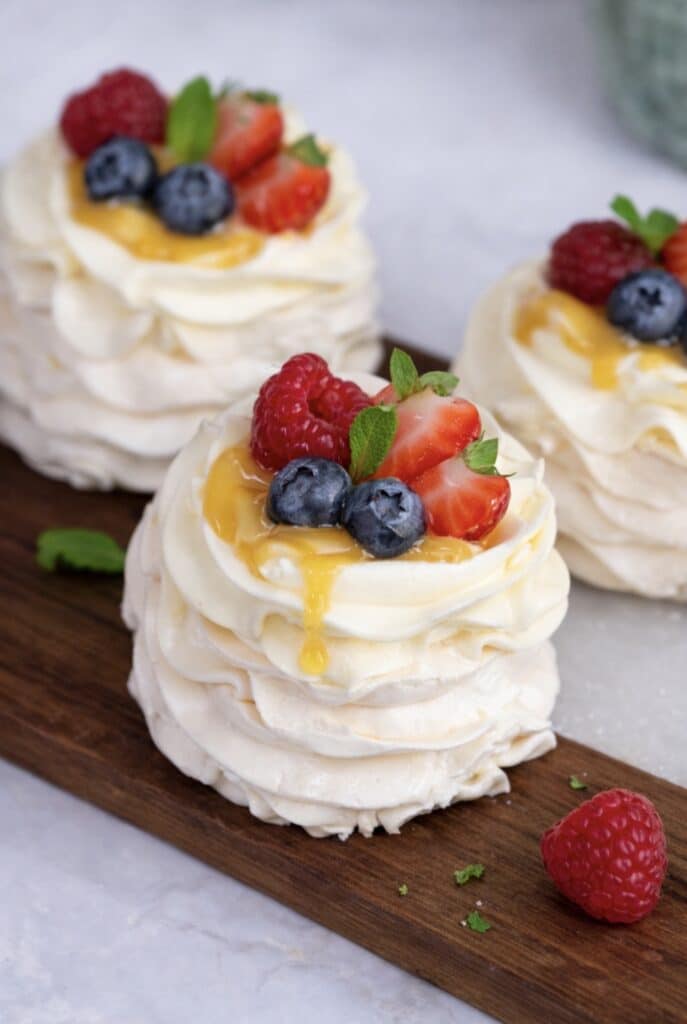
Fresh berries – Strawberries, raspberries, and blueberries add colour and freshness.
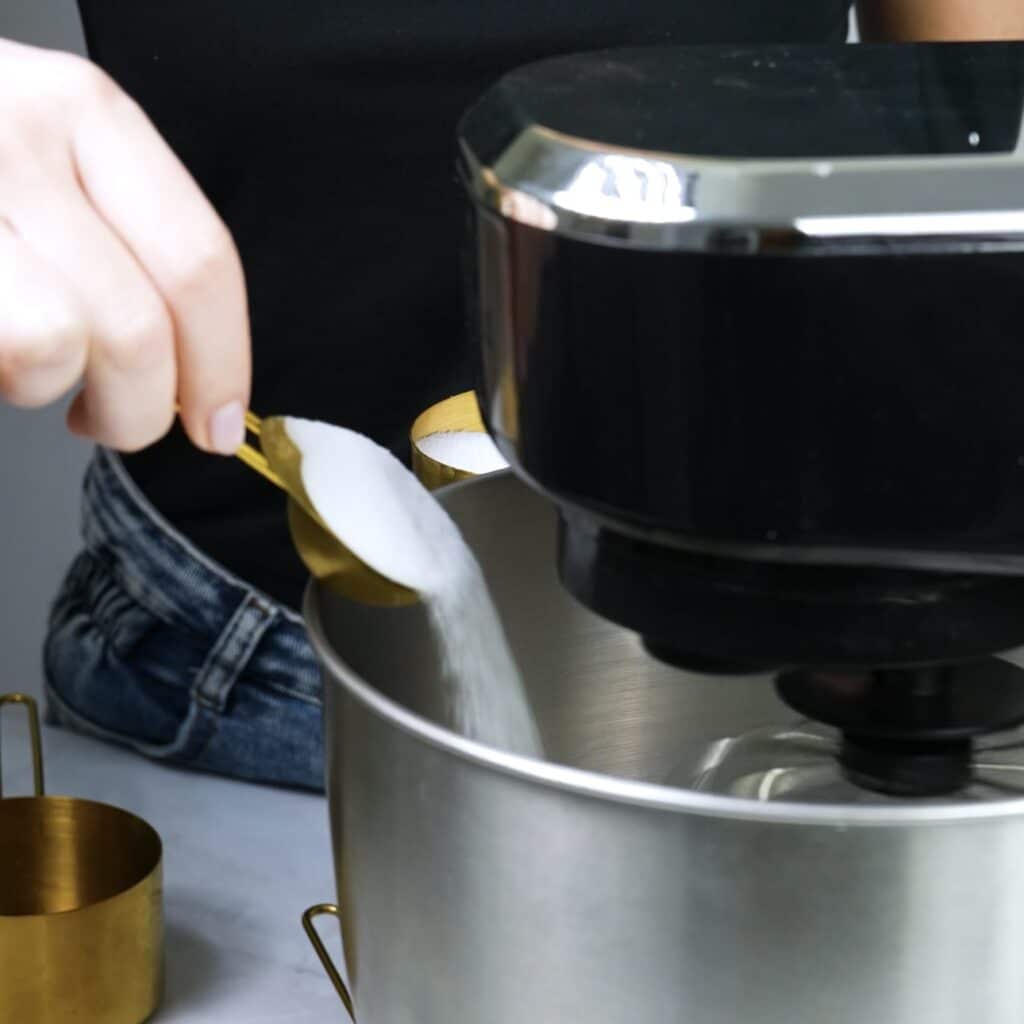
Preheat the oven to 90°C (195°F). On a sheet of parchment paper, draw six circles about 8 cm (3¼ inches) in diameter. Place the parchment paper on a baking tray with the drawing side facing down so the pencil marks do not touch the meringue. In a stand mixer, whisk the egg whites until soft peaks form. At this stage the mixture should look light and airy. Start adding the caster sugar gradually, about a spoon at a time, while continuing to whisk. Adding the sugar slowly is important because it allows it to dissolve properly and creates a stable, glossy meringue.
Gradually adding caster sugar to egg whites while whipping to create glossy pavlova meringue.
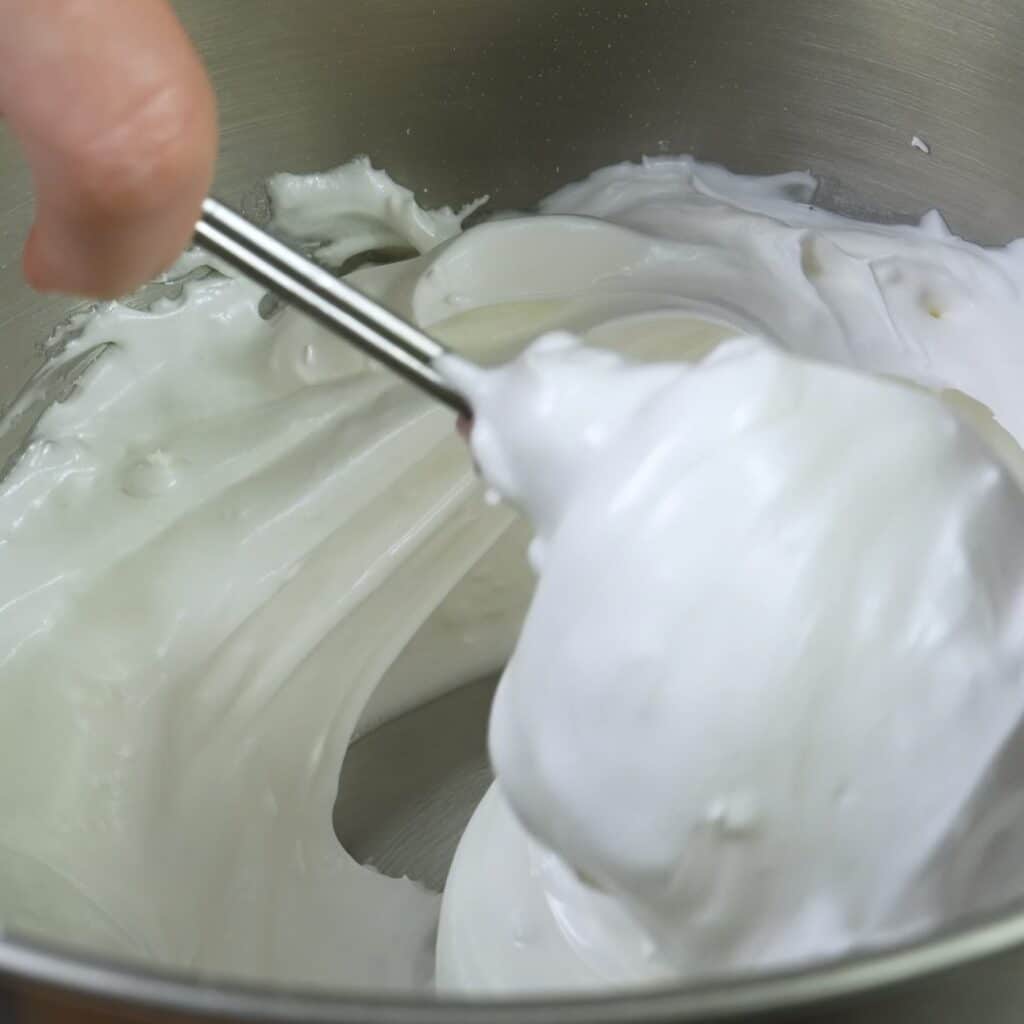
Continue whisking until the meringue forms firm peaks and looks thick and shiny. The sugar should be completely dissolved. To check, rub a small amount of meringue between your fingers. If it feels smooth rather than gritty, the sugar has dissolved properly. Sift the cornflour over the meringue and add the lemon juice. Sifting ensures the cornflour distributes evenly and prevents lumps forming in the mixture. Using a spatula, gently fold everything together just until combined. Be careful not to overmix, as you want to keep as much air in the meringue as possible.
Cornflour and lemon juice are gently folded into the meringue to stabilise the pavlova mixture.
Piping the Pavlova Nests
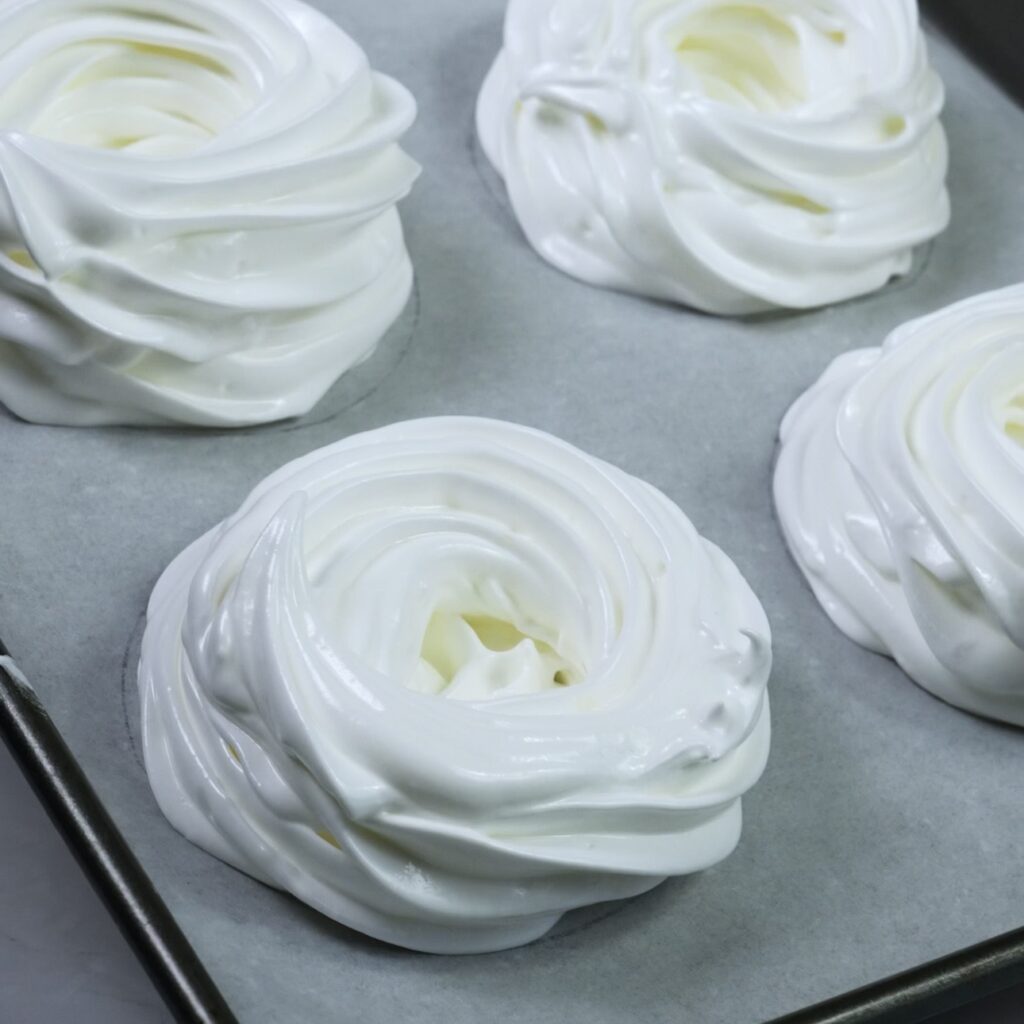
Transfer the meringue to a piping bag fitted with a star nozzle. Lift the parchment paper from the baking tray and place a small dot of meringue on each of the four corners of the tray. Return the parchment paper and press lightly so it sticks to the tray. This helps keep the paper in place while piping. Pipe six pavlova nests using the drawn circles as a guide. Start by filling the base of each circle with meringue. Then pipe two additional rounds along the outer edge of the base, building them upward to create a small wall while leaving the centre slightly hollow. This forms the nest shape that will later hold the filling. If you have leftover meringue, pipe small decorative stars between the nests so nothing goes to waste. These crisp little meringues make a lovely treat on their own.
Piped pavlova nests on a lined baking tray, ready to go into the oven.
Baking the Pavlovas
Bake the pavlovas for about 2 to 2½ hours on the lower third rack of the oven (one level below the middle). Pavlovas need to bake slowly at a low temperature so they dry out without browning. This gentle baking keeps the shells beautifully white and crisp. They are ready when the outside feels firm to the touch but the centre still has a slight softness. Once baked, turn off the oven and leave the door slightly open. Allow the pavlovas to cool completely inside the oven. Cooling slowly prevents cracks and helps maintain their delicate structure.
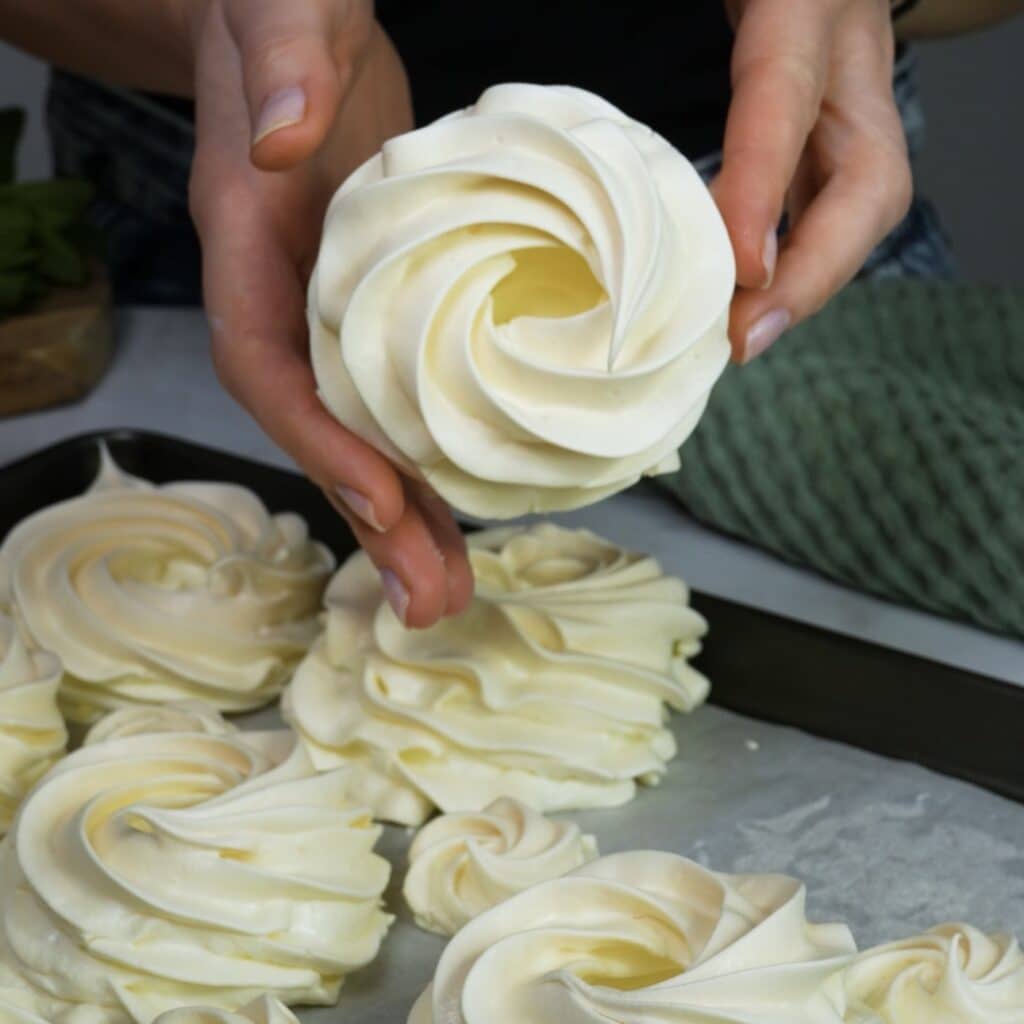
A baked mini pavlova nest with crisp shell and soft centre.
Preparing the Cream Filling
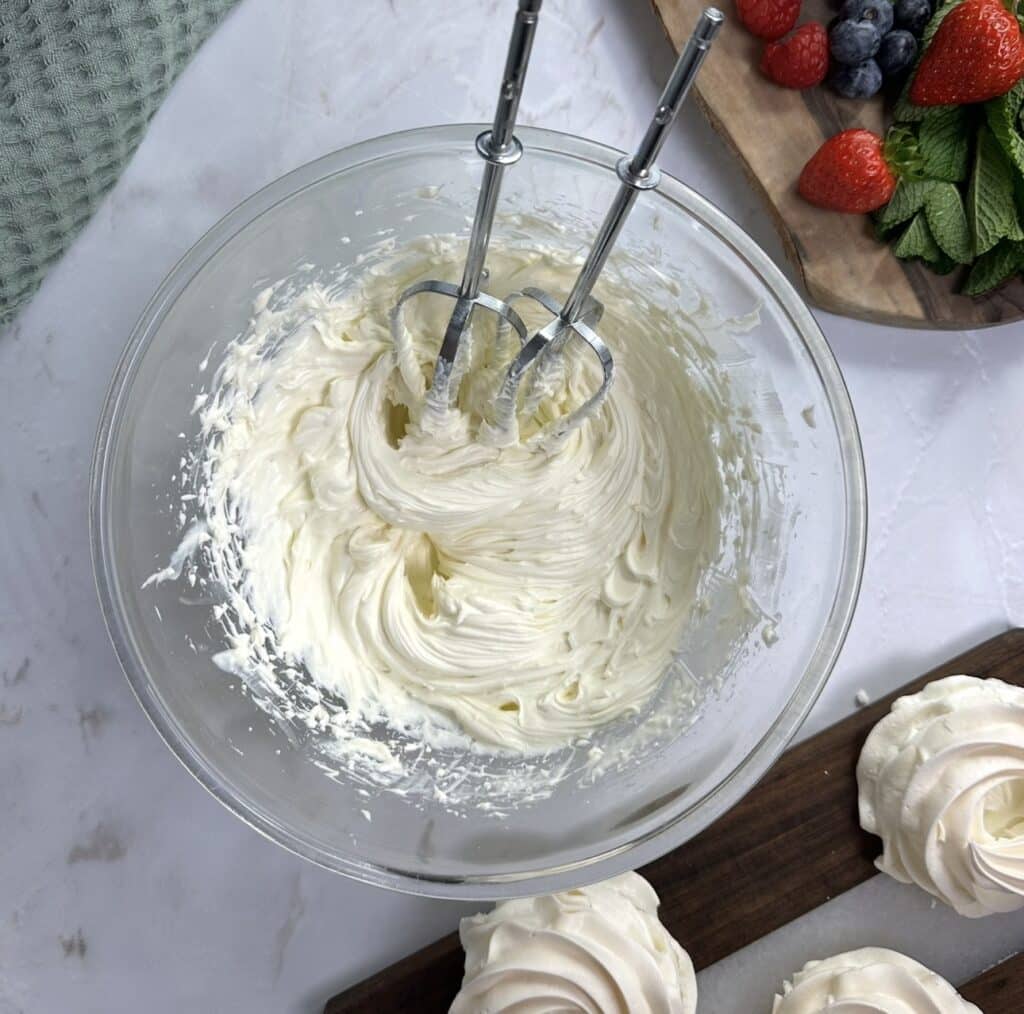
In a bowl, combine the icing sugar, double cream, cream cheese, and vanilla extract. Using a hand mixer, whisk the mixture for a few minutes until it becomes smooth, thick, and pipeable.
Cream cheese whipped cream prepared for filling the mini pavlovas.
Transfer the cream to a piping bag fitted with a star nozzle. Place the peach curd into another piping bag and snip off the tip. This step simply makes assembling easier, although you can also spoon the curd into the pavlovas if preferred.
Assembling the Pavlovas
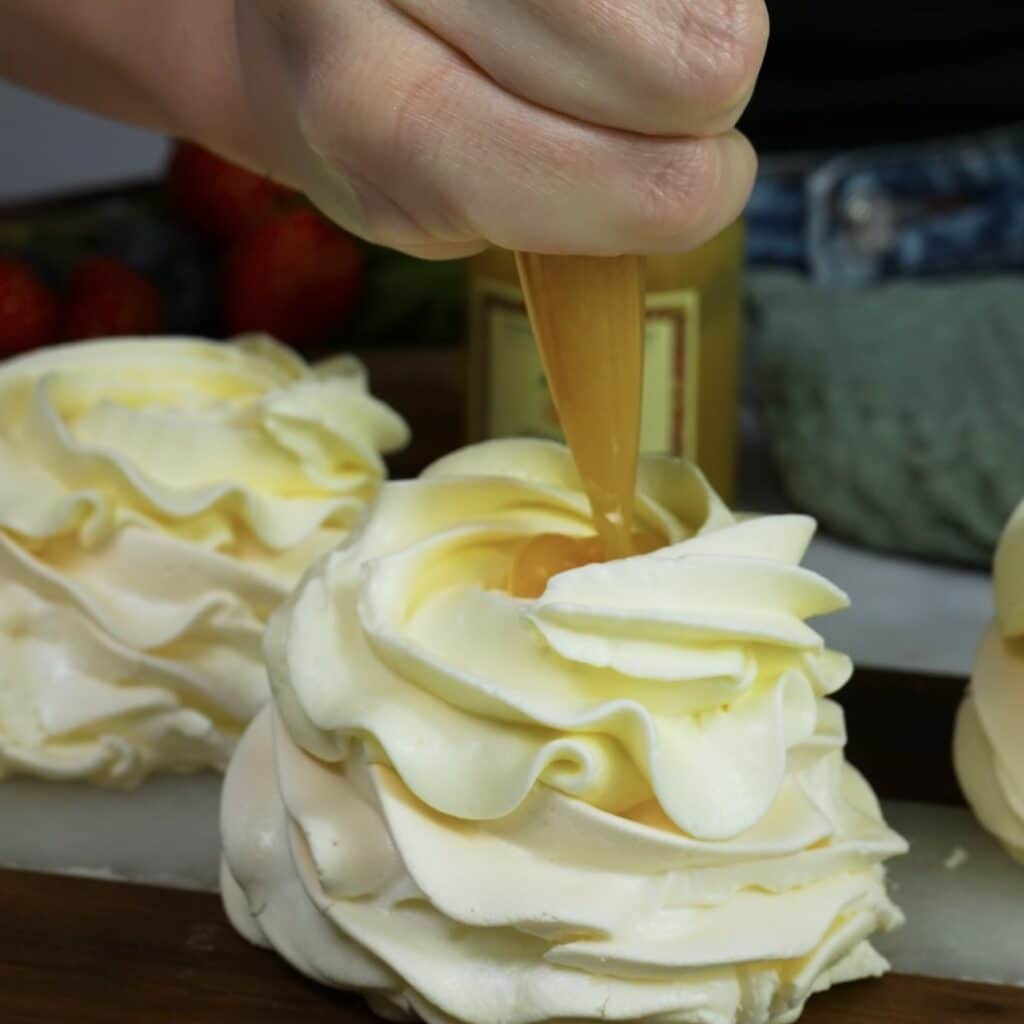
Pipe a small amount of peach curd into the centre of each pavlova nest. Add a swirl of the cream filling on top, then finish with another small dollop of peach curd.
Peach curd is added on top of the cream while assembling the mini pavlova.
Arrange strawberries, raspberries, and blueberries over the cream and garnish with fresh mint leaves. The result is a delicate dessert that is crisp, creamy, and bursting with fresh fruit flavour.
A sliced mini pavlova revealing the soft centre and creamy filling.
Why We Love Mini Pavlovas
Mini pavlovas are elegant yet surprisingly simple to make. Their airy texture makes them lighter than many desserts, while the cream and fruit provide richness and freshness. Another advantage is that the meringue shells can be prepared a day in advance and stored in an airtight container. When ready to serve, simply add the cream and fruit. If you enjoy desserts that combine delicate textures with fruit flavour, you might also enjoy Passion Fruit Ricotta Dessert (Syrok), Berry Semolina Tart, or sweet treats like Mandarin Panna Cotta, which offer similar balance between sweetness and brightness.
Perfect for Any Occasion
Peach Curd Mini Pavlovas are perfect for celebrations, afternoon tea, or summer dinners when you want a dessert that feels light but special. Their individual size makes them ideal for entertaining, and they can easily be adapted with different fruits depending on the season. Peach curd can be replaced with lemon, mango, or passion fruit curd for a different flavour profile. Fruit desserts always bring colour and freshness to the table, whether it’s a delicate pavlova, a slice of Easy Apple Bakewell Tart, a creamy Mandarin Tiramisu, or an all time favourite Frozen Strawberry Yogurt Gems served alongside Raspberry Cottage Cheese Bars.
Instagram Tutorial & More
Want to see how these pavlova nests are piped and assembled? Watch the step-by-step tutorial on Instagram and don’t miss other delicious desserts like:
Peach Curd Mini Pavlovas are delicate meringue nests that are crisp on the outside and softly marshmallow-like in the centre. Each pavlova is filled with a smooth vanilla cream cheese filling and a bright, fruity peach curd that adds a lovely balance of sweetness and tang. Fresh strawberries, raspberries and blueberries make them look as beautiful as they taste. Baking them slowly at a low temperature keeps the meringue perfectly white and light. These individual pavlovas are ideal for dinner parties, afternoon tea or special occasions when you want an elegant dessert without complicated techniques. Simple ingredients and a make-ahead friendly meringue make this recipe both practical and impressive.
Prepare the meringue: Preheat the oven to 90°C (195°F). Draw six circles about 8 cm (3¼ inches) in diameter on a sheet of parchment paper and place it on a baking tray with the drawing side facing down. In a stand mixer, whisk the egg whites until soft peaks form. Start adding the caster sugar gradually, about a spoon at a time, whisking continuously until the meringue becomes thick, glossy and forms firm peaks. The sugar should be fully dissolved. You can check this by rubbing a little meringue between your fingers. It should feel smooth, not grainy. Sift the cornflour over the meringue and add the lemon juice. Sifting helps distribute the cornflour evenly and prevents lumps forming in the meringue. Gently fold everything together with a spatula just until combined, being careful not to deflate the mixture.
2
Pipe and bake the pavlovas Transfer the meringue to a piping bag fitted with a star nozzle. Lift the parchment paper from the tray and place a small dot of meringue on each corner of the baking tray. Place the parchment back on top and press lightly so it sticks in place and does not move while piping.
3
Pipe six nests. Start by filling the base of each drawn circle with meringue. Then pipe two additional rounds directly on top of the outer edge of the base, building them upwards to create a small wall and leaving the centre slightly hollow. This creates the classic pavlova nest shape. If you have any meringue left, pipe small decorative stars between the nests so nothing goes to waste. Bake for about 2 to 2½ hours on the lower third rack of the oven (one level below the middle). Baking slowly at a low temperature helps the pavlovas stay white and crisp rather than browning. They are ready when the outside feels dry and firm but the inside still has a slight softness. Turn the oven off, leave the door slightly open and allow the pavlovas to cool completely inside the oven.
4
Prepare the fillin: In a bowl, combine the icing sugar, double cream, cream cheese and vanilla extract. Whisk with a hand mixer for a few minutes until the mixture becomes smooth, thick and pipeable. Transfer the cream to a piping bag fitted with a star nozzle. Place the peach curd in another piping bag and snip off the tip. This simply makes assembling easier, although you can also spoon it in if you prefer.
5
Assemble: Pipe a small amount of peach curd into the centre of each pavlova nest, then pipe the cream filling on top. Finish with another little dollop of peach curd. Arrange the strawberries, raspberries and blueberries over the cream and garnish with fresh mint leaves before serving.
Make sure the mixing bowl and whisk are completely clean and free of grease. Even a small amount of fat can prevent the egg whites from whipping properly.
Egg whites whip best at room temperature. If your eggs are cold, separate them first and let the whites sit at room temperature for about 20 minutes.
Add the sugar slowly. This allows it to dissolve properly and creates a stable, glossy meringue. If the sugar is added too quickly, the meringue can become grainy or collapse.
Properly whipped meringue should hold firm peaks and look thick and shiny. When you rub a small amount between your fingers, it should feel smooth rather than gritty.
Cornflour helps stabilise the pavlova and creates the signature crisp shell with a slightly soft centre. Always sift it to avoid lumps.
Low and slow baking is key. A higher temperature can cause the pavlovas to brown or crack.
Let the pavlovas cool slowly in the oven with the door slightly open. Rapid temperature changes can cause them to collapse or crack.
The meringue shells can be made a day in advance and stored in an airtight container at room temperature.
Assemble the pavlovas just before serving so the filling does not soften the crisp meringue shells.
Peach curd can be replaced with lemon curd, passion fruit curd, or mango curd if you want to change the flavour profile.
Keywords:
Peach curd mini pavlovas, mini pavlova recipe, pavlova nests, individual pavlovas, peach curd dessert, meringue nests with berries, pavlova with cream cheese filling, berry pavlova dessert, baked meringue nests, elegant summer dessert, gluten free dessert, pavlova with fruit, mini meringue pavlovas
Did you make this recipe?
Tag @shicocooks if you made this recipe. Follow @shicocooks on Instagram for more recipes.
Pin this recipe to share with your friends and followers.
Izabella Jakubec
Food Blogger and Recipe Developer
Hi there!
I’m Izabella, and I’m thrilled to have you here!
Here, you’ll discover a collection of simple, easy-to-follow recipes that are perfect for anyone who loves quick and delicious meals.